

/image%2F1896381%2F20151209%2Fob_cb2b49_obd365-com.png)
Tech II TIS2000 failed to install on Vmware
One of obdii365 customer bought the GM Tech2 Scanner and the TIS2000 software CD. He sent an email to our customer service that the GM TIS2000 software did not Run In xp Mode On Win7.
Problem:
“I use a GM Tech II diagnostic tool or a gm MDI to attach it to the truck, its on a cd / dvd, its a program i got on-line to reprogram GM BCMS in my truck. my problem is I can load 2007 software [its called ”TIS2000] into my computer [it only runs on a ”win xp” machine”][yes it won’t run in xp mode on a win7 machine],but I need the update to 3/2008 or 8/2008,to get it to see my vin#, so I can add power adj pedals[and some other options, I can’t get the 3/2008 to load. ”
Obdii365.com Engineers Solution: Depending on your computer hardware, you could install XP and your app in a Virtual Machine (VM) from Windows 7. Once installed and configured, you would boot your computer like normal and start XP in a window.
VMware makes Virtual Machine software called Workstation v10. They have a trial, but expect money at some point. The second best option for VM software is called VirtualBox from Sun. It is free! You would just need a compatible computer, a copy of Windows XP and time to learn the ropes and get your XP Virtual Machine (VM) up and running. Learning how to use it is a one-time thing and at that point you’ll be familiar with VM software in general. That is a huge benefit to have as a computer user.
At that point you would meet the requirements of the GM Tech 2 software and would install TIS2000 within the VM and use the virtual com/serial port to connect to your computer serial port (or USB).
http://blog.obdii365.com/2016/03/10/gm-tech2-tis2000-failed-to-run-win7-virtual-machine/


BMW INPA K+DCAN Cable UBatt and Ignition Fix
Here is the customer solution to the BMW INPA K+DCAN USB cable UBatt and Ignition black always black issue.
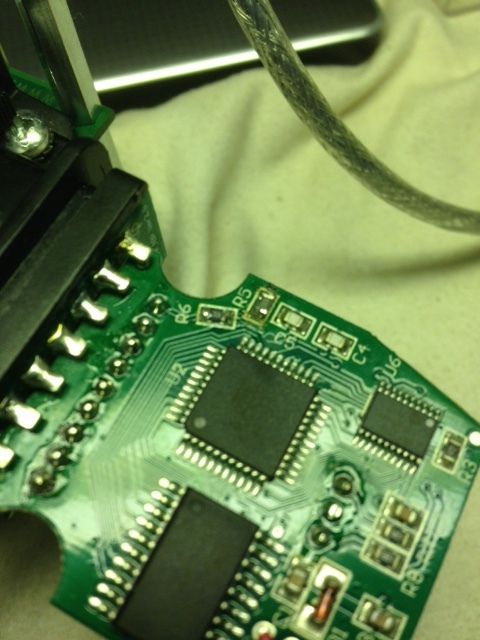
So, got my self a high quality INPA K+DCAN Interface from China. Interface looks very well designed and has a nice PCB, all components soldered properly on the board.
Installed BMW Standard Tools 2.12 as per instructions of our friend Bimmer with all software he provided in his thread.
While connecting and testing the interface I found the UBatt and Ignition dots were always black. Interface connected to OBD2 or not.
Decided to try to fix this and started to read. Found that RI from TTL-USB converter is used to indicate UBatt and DSR/DTR is used to indicate Ignition ON.
Traced back the tracks from OBD2 pin 1 and found 2 resistors mounted on the board as voltage dividers. However the values and connections were as: Pin 1 -> 1K -> 47K -> GND.
These were not the proper values to get ~5V at the junction between both resistors. Changed them to 47K and 22K. That solved the Ignition ON indication problem. See picture “Ignition.jpg” resistors R5 & R6.
Then moved on to the UBatt problem. Seems the RI pin on the FTD232RL is directly connected to GND on the board. That is why the UBatt dot is always black.
So, I lifted the pin (UBatt_1.jpg) and used a transistor BC547/1K/10K as inverter to pull this pin to GND if the interface gets +12V on pin 16 of the OBD2 connector (UBatt_2.jpg).
Now both indications work as intended.
You can easily find out if it is the K+DCAN interface or soft setup the reason for the black dots.
Just start Inpa software without the interface connected to the OBD2 in the car or the USB. Dots should not be black. Must say that I have not found any entry yet in Ediabas.ini which will cause the dots to be black without an interface connected. There are entries to instruct EDIABAS to flag an error or not if the Ubatt/Ignition are not sensed by the soft.
I expect the software requires the info that power and ignition is on, hence the option to have the error detection ON or OFF in Ediabas.ini.
I’m not an expert in BMW, but for Mercedes the software instructs to switch ignition OFF at a certain moment, detects that and starts a timer. After the timer expires the instruction is given to switch Ignition ON, detects that and the program continues. Expect BMW soft has similar functions like that. May be some one more experienced in BMW diagnose can shed some light on this.
Please find my handmade sketch for the circuit attached. Blue: existing components on board Red: new components to be added Green: wires to be soldered
Transistor can be any low power NPN type.
I expect that the circuit also will work without the transistor, but then the RI pin must be inverted in the FT chip configuration with Mprog and the junction of both resistors connected to the RI pin. How ever, I did not test this yet.
The modification is not required to communicate with the car. I did diagnose an E46 succesfully before these mods. If yours does not communicate with your car then check: – if you have 20pin connector at engine bay. If so, you should use that one for diag and not the OBD2. – If you can get data from engine ECU but not from other controller then you should bridge pin 7&8 in the interface. – if ediabas.ini is set to std:obd – if the right port is set in ediabas.ini (expect this is correct) – if port latency is set to 1 in system hardware
If all is set ok and you are at the right diag connection at your car then download Free Serial Port Monitor to see what is going on between PC-interface-Car. You can actually see the requests and replies. This free software also shows you the status of the RI and DTS/CTS signals, very handy while testing with the resistors and transistor.
http://blog.obdii365.com/2016/03/10/inpa-kdcan-ubatt-and-ignition-black-solution/
www.obd2eshop.com

How to install V156 Renault CAN CLiP software
Renault CAN CLIP diagnostic interface software V156 for Renault/Dacia is released and verified working in obdii365.com. Here is the step-by-step CLIP software installation guide provided.
Software version: V156
Operating system:Windows XP Multi-Language:English/ German/ Brazil/ Denish/ Spanish/ Finnish/ French/ Italian/ Norwegian/ Dutch/ Portuguese/ Romania/Swedish.
Installation main steps:
Step 1: Install Renault CAN CLIP V156 setup
Step 2: Install Windows Resource Kit Tools Setup
Step 3: Register Renault CLIP V156
Step 4: Install Renault CAN CLIP hardware wizard
Step 1: Install Renault CAN CLIP V156 setup
Open CAN CLIP 56(E:) CD
Cut and paste Activation (Patch V3) to desktop
Open Activation patch folder
Double click Crack Renault CLIP
Click Yes>>OK to accept Registry Editor notice
Open setup.exe on software folder
Come to FISRT INSTALLATION, click on it
Accept license agreement
Click Next
Select your country, click Next
Select the application language, click Next
Select the manufacturers to install, select Renault, click Next
Click Next
Step 2: Install Windows Resource Kit Tools Setup
Install Windows Resource Kit Tools Setup, click Next
Accept license agreement, click Next
Enter user information: Name and Organization,click Next
Click Install Now
Wait the system configuration until FIRST INSTALLATION completed
Click Finish
Step 3; Register Renault CLIP V156
Open Activation(Patch V3) folder on desktop
Right click CLIP software->Find Target-> cut the RSRWin file on Application folder to desktop
Then copy RSRWin file on Activation(Patch V3) folder to Application folder
Open RSRWin file on Application folder
Accept the license and click “Register me now”
Follow the Renault CLiP Registration step-4 to enter the security code and confirm
Copy and replace RSRWin file on desktop to Application folder
Step 4: Install Renault CAN CLIP hardware wizard
Connect Renault CAN CLIP interface with computer via USB cable
Wait the system to detect the hardware driver
Select “Install the software automatically (Recommended)”, and click Next
Click Finish when completing the Found hardware wizard
Open My Computer->Device Manager->Bosch Automotive Service Solutions Device->IB-Allance Vehicle Communication Interface to check if driver is well installed
Open CAN CLIP software on desktop
Check new version CLIP V156 information
Select vehicle information and run a “Computer Test”
http://blog.obdii365.com/2016/03/08/how-to-install-renault-can-clip-v156-software/
www.obd2eshop.com
ETKA catalog 7.5 Feature has expired solution
ETKA 7.4/7.5 Electronic Catalogue online for Audi/VW/Seat/Skoda pops up error “Feature has expired (H0041)”, how to solve?
Error message:
Sentinel HASP Protection System Feature has expired (H0041)
Easy solution to fix “Feature has expired (H0041)” :
Free download VAG ETKA dll files
Then Etka 7.4/ 7.5 works again after copying 2 DLL
* Ps. Test on win7 pro x64 if it doesn’t work for ETKA 7.5
ETKA catalog software works normally:
http://blog.obdii365.com/2016/03/06/etka-7-4-feature-has-expired-h0041-solution/
MB Star W164 SAM Offline Programming Problem Solution
One of customers sent an email to obdii365.com customer to report that he has a question that no option to program the SAM using offline programming with MB SD Connect C4 multiplexer and Xentry 12/2015 fail to do. Here is the proper solution provided by our technician.
Customer testing vehicle and MB star diagnostic version:
2005 ML350 4Matic
MB SD C4+ Dell D630 laptop+ 2015.12V DAS/Xentry
Problems Description: Problem one: Problem with the front SAM, when select Yes the next screen goes to online programming. There is no option to program the SAM using offline programming. At least I couldn’t find it. The starter doesn’t even crank.
Problem two: Secondary problem is the ISM. The original module generated a message on display: “Drive to workshop without changing gear”. The transmission now is stuck in Park. I installed another identical module from another ML350 and the message is gone but there is no reaction when changing the shifter from park to other positions. I get a message to depress the brake even when the brake pedal is depressed. Also, when I go to the Developer option I get the message the file is missing, see photo. So, I have two serious problems to deal with. I’m looking forward to your feedback.
Obdii365.com Engineers reply and solution way:
Please can not use ISM from other car,..use brand new,..marry it to the vehicle and you will probably start the engine. Then program front sam online,..or if you don’t have online access,..pass this step,..it has program inside it generally.///code it manually according your car,..and if still has SAM errors,..probably could change it with new one! Neither ISM neither SAM need online or offline,..they always can be initially startup manually with DAS
As for the question “I don’t know why when I accessed the front SAM with DAS it gave me a message saying that the SAM needs to be programmed. See the attached photos. It is not my imagination. This is what I got when trying to read the fault codes from the front SAM.” I guess: probably your sam is almost dead.//put other one used..or new one
http://blog.obdii365.com/2016/03/03/mb-sd-c4-w164-front-sam-offline-programming/
FAQ Kess v2 firmware 4.036 ECU tuning kit
Kess V2 V2.13 Firmware 4.036 OBD2 Master tuning kit (best quality version SE87-D) as we know it has a token reset button help you reset the token easily. Here is the FAQ list help you know better the ecu programmer.
Q: KESS V2 4.036 is master version or slave version? A: It is master version.
Q: KEES V2 just only be installed on windows XP system? A: KESS V2 can install it on Windows 7 and Windows XP.
Q: What is the difference between KESS V2 and Ktag K-TAG? A: KESS V2 has OBD function, but Ktag does not have this function.
Q: Can KESS V2 update? A: Please don’t update it, or it will damage the firmware of kess v2, you just can ship back to us for repair.
Q: What is the difference Between KESS V2 and Fgtech Galletto V54? A: They both can do many cars, but they do cars via different ways. Fgtech V54 has BDM function, but KESS V2 does not have. Kess V2 has Anti-mediation lock module, it can do new and encrypted cars better than Fgtech V54.
Q: Customer told us that KESS V2 can not do EDC17 well, such as Bosch EDC 17 (cp04-CP14-CAN-Med17.X ) and Bosch Bosch EDC 17 C54( Passat, Golf, Crafter, Octavia, Yeti-VW). EDC16 all ok. A: Yes, Kess V2 can not do EDC17 at present. It can do EDC16 well, but when you do it, you need to connect the Anti-mediation lock module to read and write data for vehicles. Becuase new style vihicles have new encrypted ways.
Q: How to do checksum for kess v2? Does the kess v2 automatically re-write it? Kess V2 can do trucks? such as Mercedes MP1/MP2/MP3 or MAN TGA? A: After reading the software, the device will automatically do checksums. KESS V2 can not do truks, it will damage the firmware of kess v2. But KTAG can do trucks.
Q: If you encountered the problem for checksum error when reading the ecu? how to solve it? A: One of obd365.com customer tested by this way: please search the software ” microsoft visual C++ 2005, 2008, 2010″ on google, then install it on your computer, then it can solve this problem.
Q: When KESS V2 read ECU, I got checksum error. A: Please search “visual C++ 2005 library” on Google, then download it and install it, this error will be solved.
Q: How does KESS V2 checksums work? Does KESS V2 automatically confirm and rewrite? Does KESS v2 work with truck? Such as: Mercedes MP1/MP2/MP3 or MAN TGA. A: After reading the software, kess v2 will automatically calibrate checksums. KESS V2 doesn’t work with truck, because the truck voltage is too high and KESS V2 will be burnt out.
Q: How to connect KESS V2 to K-LINE med 17, do you have any manual or diagram? A: If your car is OBD diagnostic socket, just plug the OBD cable into the car; if your car is not OBD diagnostic socket, after you select the ECU type in the KESS V2 software, the diagram will appear and show you how to connect.
Flash with VAS 5054A ODIS Engineering on AU56X
This is the instruction on how to flash AU56X with Bluetooth VAS 5054A ODIS V3.0.1 engineering diagnostic software.
Preparation
– battery: connect a battery charger for your vehicle, ANYTIME
– vehicle: Before you start flashing, start and stop the vehicle to prevent the power saving mode.
– computer:
Connect your computer to charger, some updates can be long.
Ensure that the computer does not contain any faults
– software: ODIS-E_6.2.2_new.rar
Note: FREE. NO PASS.
files indluded:
ODIS Engineering 6.2.2 + PostSetup + Projects (Multilingual) cracked, with launcher (Note: we are not responsible for what you try)
– device: connect the head VAS 5054 interface with the usb cable.
Steps to flash AU56X with ODIS-E
Information on ODIS report up in the vehicle data:
Then inside ODIS go and choose your engineering “project vehicle” as follows:
AU56X in this case
Click on the green triangle
the list of computers with different options on the right
Select the computer to update and double click on Flashing right
Then select the computer you want to update and click File local Flashing. In
principle on the DVD of Flash, you can only select the flash file on your computer
Note: you can also select an older version; that is, maybe the software will allow flashing with.
on system No 17, which corresponds to the instrument cluster is version 0120
So, select the 0240 release
Also, ok to select the updates to the other computers that it be done in the future without
further intervention.
(Personally, this would not be recommended unless you follow the precautions.)
click Start Flashing:
Now a security window will appear:
Click YES, and Flashing begins:
LOOK AT THE TIME IT TOOK TO FLASH INSTRUMENTS MODULE 17 – 26 MIN
Once completed, cut and replace the contact and validate the window, by software pop-up
erase all memories of events on all systems, click YES.
And then the report window is displayed:
The flash was successful, system 17 passed on new version
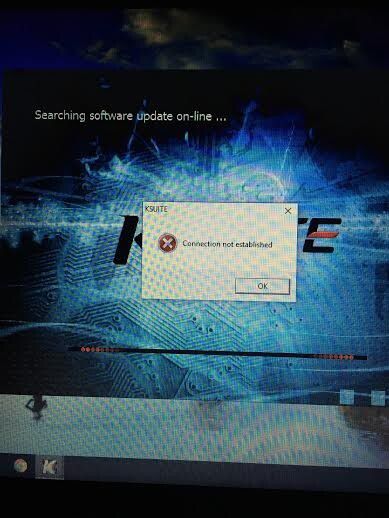
KESS V2 4.036 “Connection not established”
Problem: One of the V2.15 KESS V2 firmware V4.036 ecu tuning tool master user had followed the video guide to set up Ksuite software on Windows XP,but the system still displayed error message”Connection not established”
Possible reason: 1.He has not well installed the Kess v2 driver
2, The operating system is not compatible with the ksuite.
3.He has not well installed the TF card.
4. The Kess v2 4.036 ecu programmer is damaged.
Solution:
Disable internet connection. Change another Win XP laptop. Re-install the KESS Ksuite software.Id still fails,please send back the main unit for repair.
http://obd365.blogrip.com/2016/03/01/kess-v2-v4-036-connection-not-established/
Install BMW Scanner 1.4 Pa-soft on win7 32bit
Here is the step-by-step instruction to help out those who failed to install BMW Scanner V1.4.0 unlock (never locking) Pa-soft diagnostic software driver on Win 7 64-bit by installing BMW Scanner USB driver on Windows 7 32-bit instead.
Pa-soft download:
Free download BMW scanner V1.4.0 Pa-soft
http://www.chinaautodiag.com/download/bmw-scanner-1.4.0-v-never-locking.zip
If the driver is not compatible with Windows 7 or you have not logged in as “Administrator”, latest win 7 driver can be downloaded here:
http://www.ftdichip.com/Drivers/CDM/CDM20808.zip
The USB driver can be installed for win7 32 bits without any issue. But for Win7 64-bit, you need to download the latest driver from www.ftdichip.com.
BMW scanner 1.4.0 USB driver on Win 7 32-bit instruction:
1) Remember where the folder/the program is installed. This will help to tell Win 7 O/S to locate the USB driver. For example: I:\3 in 1\bmwscan140a\bmw 140 driver.
2). Click Window “Start” button and chose “Control Panel” GUI button
3) Select “System” and then “Device Manager” GUI button
4) Select “Universal Serial Bus controller”
5) Select the USB device that is labeled as “BMW Scanner”
6) Right click to invoke sub menu of the “BMW Scanner”
Select “Update Driver Software”
7) Select “Browse My Computer for Driver Software”
Click “Browse” and locate where the software folder is located. And tick “Includes subfolders” as well.
9) Locate “BMW V1.4.0 Drivers” folder and press the “OK” button.
10) Check the folder is correct and click on the “NEXT” button to install the USB driver.
11) When the system will display “The best driver software for your device is up to date” message, the BMW scanner driver is well installed on Win 7,
12) Right click on the BMW Scanner and select “Properties” to confirm “The driver is working properly”. Please ensure that you MUST have “administrator right” to install the USB driver.
13) Plug the BMW scanner 1.4 cable with vehicle via OBD diagnostic socket. The label should be facing to the door with the LED light turn ON.
If your BMW model has 22-pin diagnostic socket, you properly need another BMW 20-pin to OBD2 16-Pin Connector.
http://blog.obdii365.com/2016/02/28/how-to-install-bmw-scanner-1-4-0-on-win-7-32-bit/
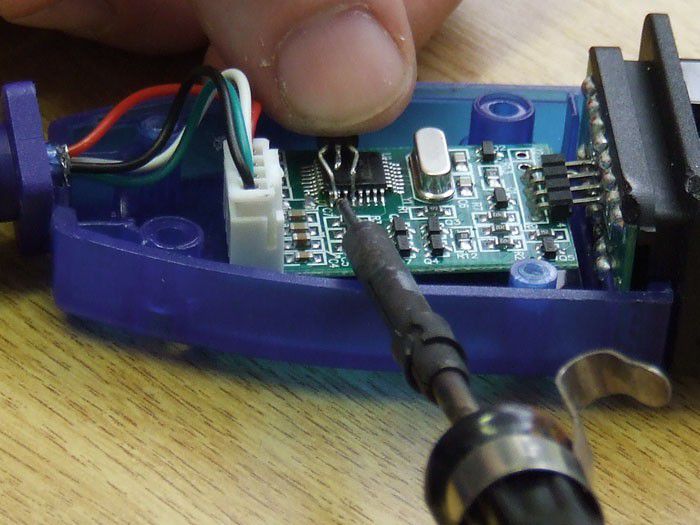
Modify VAG KKL 409 to work with INPA/ISTA
Here is obdii365.com customer DIY guide to make Vagcom Cable 409.1 modified to work with BMW INPA / SSS / ISTA-D / ISTA-P / DIS diagnostic software.
Note: This requires Good soldering skills and understanding. We are not responsible for the damage.
Standard 16-pin OBD PIN Please follow The Following steps: 1. First get a USB Vag 409 / vag-com 409.1 KKL cable (it is an old cable), ask the seller if it: has a FTDI FT232RL chip (FT232BM gold FT232BL Chips aussi work, but needs a bit more work). The FTDI chip supports software mods. 2. Download the driver http://www.ftdichip.com/Drivers/CDM/CDM%...tified.zip I prefer the driver 2.10.00 as the it-have newer drivers Given problems in some cases. Now unpack it, connect the cable, and installed with this driver.
3. Go To the advanced COM port settings and set for Com 9 if you are schedule to use BMW ICOM ISTA ISTA-D-P or whatever else you set the settings for Ediabas com. Also set to 1ms latency.
4. Open your vag cable casing and what you'll need to do is put a micro switch entre pins 7 and 8, so pin 7 and 8 pin can be shorted to be enabled for 09/2001 - 09/2006 cars, and disabled for newer cars, if you are only using the cable was older vehicle only you can bridge the connection by soldering together gold Then just leave em unconnected for newer vehicles.
5. These are the K lines on older vehicles, Otherwise you will not be ble to access to all modules of the car.
6. Now download MProg 3.5 http://www.ftdichip.com/Resources/Utilit...rog3.5.zip
7. If you do not want to do further Top Any soldering (RL Chip) you can run MProg, Otherwise jump to step 9. (If you-have a BM / BL chip please do step 8 And Then come back to this step) a. Go to Tools Menu -> Read and Parse Invert RI # and DSR # signals to fool the detection of battery and ignition, in order to be reliable to fool the software into thinking battery and ignition is fine. B. I / O Controls settings: # C0 = RXLED # C1 = TXLED # C2 = POWERON # C3 = PWRON # C4 = SLEEP
c. After making your changes: "Save Template as" (floppy green button, or File-> Save as ..) d. Program cable with the new settings: "Program" (Lightning button, or Device -> Program) e. These Settings are saved on the chip, so won't-have to be set every time. F. Cable aught to work now.
8. Do not do this step if you are going to go for real ingnition and battery option. If your vagcom comes with FT232BM / BL chip, you only need to do this extra work. Pin 17 is GND pin 18 is RI pin 20 is DSR So you need to solder pins 17,18 and 20 of the FTDI chip (this Applies to the BL and BM) like this.
BM and RL Chip Pinout
9. If you want some REAL battery and ignition detection, you will need The Following (For RL Chip) 1 x 4.7k ohm resistor 1 x 100k resistor (Higher is better) 1 x BC547B Transistor
10. For RL Only, Bridge PIN6 RI # Pin7 and GND, Then Pin9 DSR # BC547 is soldered to the leg with 4.7Kohm resistor, qui est in turn soldered to the second solder points on the cable side as in picture bellow, the middle leg of the transistor you connect inline with the 100k resistor to pin 1 of the odb the plug, and l'autre leg of the transistor is connected directly to pin 6 on the main pc board That connects to the odb connector. For RL chip you can now go to step 14.
RL Chip Pinout
(For BL / BM Chip) 1 x 100k resistor (Higher is better) 1 x BC547B Transistor
11. Bridge pins 17 and 18 of the FTDI (RL) chip - this will form a basis for the next step Then take the transistor, cut the legs So They are about 1cm long and the outer bend down and two together so there is about a 2mm gap entre em. Use the iron to dab a bit of solder on To Each of the three legs as peak bellow.
12. Now solder leg (E) to the bridged pins 17 and 18. If you've prepped well this will be simply a case of holding the transister Against the top of the FDTL chip, lining up the leg and dabbing it with the iron , Then check if the C leg is sitting over 20 pine (pine has there shoulds be That You AVOID entre les That Were two bridged). If it is not, bend it so it sits over it (Pin 20) And Then dab it with the iron. The solder That You put on the leg before shoulds be enough to get 'em to join. Keep going up to They Are stuck together.
13. Now take the resistor and one leg short cut (about 1.5cm). Then settle this leg to the middle 'B' pin of the transistor (the only one now not connected), Then bend the resistor so l'autre leg sits Against the back of pin 1 of the odb connector. and solder That one too.
14. Now Close the cover and you can now use the cable. (Remember if the DI # DSR # is inverted on the chips this software is not going to work).
If this does not work just check That You do not-have a fake chip, on the real chip is the writing etched into the chip, and the fake is only printed on.
http://blog.obdii365.com/2016/02/26/modify-vag-kkl-cable-to-work-with-inpa-ista-dis/
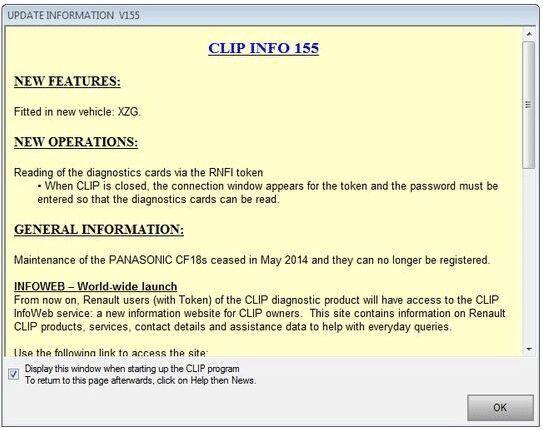
V155 Renault CAN CLIP verified working
Renault CAN CLIP V155 diagnostic software for Renault/Dacia has been tested working OK in obdii365.com, and will be released soon. Here’s the new information about the latest CLIP 155.
Renault CLIP 155 update information
– new model
Fitted in a new vehicle: XZG
– new operation
Reading of the diagnostics cards via the RNFI token
* when CLIP is closed. The connection window appears for the token and the pass must be entered so that the diagnostics cards can be read.
– general information
Maintenance of the PANASONIC CF18s ceased in May 2014 and they can no longer be registered.
– infoweb – world-wide- launch
From now on, Renault users (with token) of the CLIP diagnostic product will have access to the CLIP InfoWeb service: a new information website for CLIP owners. This site contains information on Renault CLIP products, service, contact details and assistance data to help with everyday queries.
Language:
English, German, French, Danish, Spanish, Portuguese, Finnish, Italian, Norwegian, Dutch, Romanian, Swedish and Russian (newly-added)
Hardware and software requirements for Renault CAN CLip V155:
Software requires at least AMD or Intel Celeron/Pentium CPU 1.5 GHz, 1 GB RAM, 10 GB free HDD space, USB 1.1 port (USB 2.0 recommended) and Microsoft Windows XP with the latest service pack installed.
The latest version of Renault CAN Clip run perfectly in:
* Microsoft Windows 7 32Bit, Professional and Ultimate editions, latest service pack installed.
Main menu in CAN CLIP 155:
Clip’s main menu allows you to do
– computer test
– automatic test of all computers
– reprogramming
– airbag test
– scantool (OBD tests)
– Base Doc (access to Technical Notes)
– physical measurements
– antipollution
– multimeter
It’s very simple to diagnose a vehicle using Renault CAN CLip Diagnostic Interface: just select the vehicle make, enter the V.I.N. and press ENTER.
Software display:
* display Renault CLIP v155 in Russian
* display CAN CLIP v155 software in English
http://blog.obdii365.com/2016/02/25/renault-can-clip-v155-coming-soon/
Renault CLIP 155 update information
– new model
Fitted in a new vehicle: XZG
– new operation
Reading of the diagnostics cards via the RNFI token
* when CLIP is closed. The connection window appears for the token and the pass must be entered so that the diagnostics cards can be read.
– general information
Maintenance of the PANASONIC CF18s ceased in May 2014 and they can no longer be registered.
– infoweb – world-wide- launch
From now on, Renault users (with token) of the CLIP diagnostic product will have access to the CLIP InfoWeb service: a new information website for CLIP owners. This site contains information on Renault CLIP products, service, contact details and assistance data to help with everyday queries.
Language:
English, German, French, Danish, Spanish, Portuguese, Finnish, Italian, Norwegian, Dutch, Romanian, Swedish and Russian (newly-added)
Hardware and software requirements for Renault CAN CLip V155:
Software requires at least AMD or Intel Celeron/Pentium CPU 1.5 GHz, 1 GB RAM, 10 GB free HDD space, USB 1.1 port (USB 2.0 recommended) and Microsoft Windows XP with the latest service pack installed.
The latest version of Renault CAN Clip run perfectly in:
* Microsoft Windows 7 32Bit, Professional and Ultimate editions, latest service pack installed.
Main menu in CAN CLIP 155:
Clip’s main menu allows you to do
– computer test
– automatic test of all computers
– reprogramming
– airbag test
– scantool (OBD tests)
– Base Doc (access to Technical Notes)
– physical measurements
– antipollution
– multimeter
It’s very simple to diagnose a vehicle using Renault CAN CLip Diagnostic Interface: just select the vehicle make, enter the V.I.N. and press ENTER.
Software display:
* display Renault CLIP v155 in Russian
* display CAN CLIP v155 software in English
www.obd2eshop.com
WIFI Vpecker Easydiag scanner user review
Vpecker Easydiag Wireless scanner tested feedback list as follows, the users tend to compare vpecker easydiag scanner with launch idiag when test some car models, read details as follows. 1. vpecker scanner VS Launch X431 idiag A) Test Mazda 6 GH 2.0 diesel 2008 year – vpecker scanner VS launch idiag I have tested and compared today vpecker scanner and launch idiag on Mazda 6 GH 2.0 diesel 2008 year. To be onest launch have a lot more options on that car then vpecker, for example on engine it can only read few parameters and it can read and clear trouble codes thats it nothing else on engine not even dpf regeneration,idiag have a looot more to offer for that car.
vpecker scanner can do more with special functions its for Toyota,Honda,Scion.
vpecker scanner is original interface and software price is ok for it.
there a lot of brands that is working until 2013,launch is working for all cars until 2015.
vpecker is good becuause it is even more faster then launch and original for good price, but not even close to delphi or launch because of the functions that it cannot do.
Language: And one more thing,for example there is no Croatian or Serbian Language on vpecker. Vpecker is only available with language Italian, Chinese (Simplified), English, Chinese (Traditional), Japanese, German, Russian, French, Spanish, Portuguese, Polish, Turkish, Dutch, Hungarian, Korean, Czech, Arabic, Indonesian, Persian, Thai, Vietnamese, Finnish, Swedish, Romanian, Bosnian, etc. Compare with VDM UCANDAS which need to customize language, it is easer to reset the language you want.
B) Tested on Kia Cerato petrol- vpecker scanner VS launch idiag I tested on Kia Cerato petrol,and finally some result, it haves options like launch idiag only one function is not there and that is brake fluid bleeding,all the rest functions are the same. So far all cars that i have tested this one is the first one that haves some extra functions…
C) Tested VW Golf MK IV 1.9 tdi – vpecker scanner VS launch idiag I have tried today on VW Golf MK IV 1.9 tdi,haves a lot of functions,this time even more then launch idiag,it haves even geuided function,and a lot special functions,and login,taht is the first that vpecker works even better…
2. Tested on ASTRA J 2011 1.7 cdti I have tested today on ASTRA J 2011 1.7 cdti wroks ok,haves special functions not a lot but ok. But it works until 2011,..
3. Tested on BMW 530d E60 I tested vpecker ver.6.3 (last) on BMW 530d E60 engine connect, but only read/erase fault code and live data, service reset (Tested) Vpecker can do injector cooding for a part of Toyota models.
vpecker scanner often update on the official site, I will test them in the near future more cars. Hope my feedback helps ou!
4. Vpecker vs Delphi DS150e on function DPF regens Vpecker does DPF regens easily. My DS150e can’t even do that although it is listed as one of it’s functions. Even with DieselMax installed I couldn’t force a DPF regen on any VWs or BMWs.
FAQ: license failed, how to do? Did you register? if not go to register firstly. If you have registered, what is your computer operation system? VPECKER works fine with win7.
If you have activated thru email etc, the reason you get this error: You may write uppercase”VW” as lowcase “vw” then get error “license fail”. Here is the solution, please follow the steps: step 1: download the “WIFI_CONFI_VW15080075.exe1″ file step 2: rename “WIFI_CONFI_VW15080075.exe1″ to “WIFI_CONFI_VW15080075.exe” step 3: make sure your PC wifi connect the Vpecker step 4: run the “WIFI_CONFI_VW15080075.exe” step 5: click “WIFI CONFIG” button step 6: when display “CONFIG WIFI SUCCESS”, the Vpecker WIFI SSID will change to “VW15080075″
Solution: just download VPECKER V6.4 software at offical site: http://www.vpecker.com/vpecker-software-download/ it can solve the problem of uppercase”VW” and lowcase “vw”.
www.obdii365.com

vpecker-easydiag-wifi-scanner
How to read pin code with VVDI-PROG in 5 ways
Original Xhorse VVDI Prog programmer support Pin code calculation for a number of vehicles makes, including Ford Nissan Hyundai VW… In the following post, I will show you 5 ways optional to get Pin Code with VVDIProg.
In the drop-down menu box of “Pin code calculator”, the supported vehicle makes will be listed, such as: Ford, Mazda, Nissan, VW and more.
Way 1: Ford – get Incode with Outcode
Firstly, select “Ford” – “Outcode->Incode”
Input outcode and click “Calculate” to get Incode
Checking device… wait 2 minutes and you can monitor the whole procedure until the calculation complete and get the Incode
Way 2: calculate Nissan 20 digital PIN code
Select “Nissan” – “PIN 2013-” in the drop-down menu box of “Pin code calculator”.
Input 20 digital BCM Num, wait several minutes until you see “initialization successful” at the left corner, and meanwhile VVDI-PROG yellow indicator flash. Then click “Calculate” to get PIN.
Way 3: Calculate PIN code by VIN.
Take Hyundai for example.
A part of vehicles can get PIN code by VIN, take Hyundai for example.
Select “Hyundai” in the drop-down menu box of “Pin code calculator”.
Copy and paste the VIN into the blank box, then click the “Calculate” icon to get PIN.
Way 4: Load data to calculate PIN
Take VW for example.
Select “VW” in the drop-down menu box of “Pin code calculator”, then a window pops up, click ” Load file” and then select the BIN file to load. Checking device…wait 2 minute and you will get PIN code at the left corner.
Way 4: Get Pin by comparing the data.
Click the folder Icon named “Open” in the menu; select the file to go on.
http://obd2all.blogbaker.com/2016/02/11/vvdi-prog-read-vehicle-pin-code-in-5-ways
http://www.autelsale.com/
How to Reset BMW IDrive Information Warning
I recently replaced my Brake pads on a 04 E60 and needed to reset the Idrive Information I did some google searchers and found the following information. There are two way to do it: use ENET EasyCoding scanner to customize the settings in iDrive or manually reset it. The BMW EasyCoding OBD2 scan tool is 400 more dollars, thought I would just do it manually.
I tried the solution on my E60 and it worked great. I am thinking that other models with Idrive will work the same way, so I would like to share it here and hope it helps anyone.
Firstly turn on the ignition, set the odometer trip meter back to zero by pushing it once. Then switch the ignition back off again. (Do follow this step, otherwise you could not get to the “Service” menu).
Now let us do the resetting:
- Switch the ignition on (so that the battery, Oil and Parking brake lights are displayed) and the key is ready to start the engine – but don’t actually start the car.
- Press the odometer reset button for between 5 and 10 seconds until a yellow triangle with an exclamation mark in the centre appears in the top window between the clocks (where the outside temperature / time or date normally appears) – this is the “Service” icon.
- Release the odometer button briefly and press again straight away which brings up a picture of the Brake Fluid symbol (same as the one that the i-drive shows when you look at the Service menu).
- If you want to reset the Brake Fluid interval for another 2 years then keep holding the odometer button until the word “RESET?” appears at the bottom of the lower window.
- Release the button briefly and push it in again and hold for about 5 – 10 seconds until the new date appears in the bottom window. You can then switch the ignition off and the new Brake Fluid date will appear in the service menu on the i-drive screen next time you switch on.
- If you want to reset the Oil, Microfilter or Brake Pad indicators then you will need to follow the same sequence as steps 1 and 2 above, but when you get to step 3 and the brake Fluid icon appears, just release the button and press again and the next service item will appear.
- You can continue releasing and pressing the button until the required service item icon appears for the one you want to reset. Once it does then hold in the button in until the word “RESET?” appears again as in step 4 above. Once the word “RESET?” has appeared, you need to release the button briefly and hold it in again for about 5 – 10 seconds until it is replaced by the new service interval figure (as per step 5 above).
http://obd2all.blogbaker.com/2016/02/08/bmw-easycoding-reset-idrive-warning
www.obd2eshop.com
SuperOBD SKP900 program a Dodge key
Here is a guide on programming a new Dodge key with SuperOBD SKP900 key programmer made by obd365.com technicians.
Connect the SKP-900 car OBD2 key programmer to the car and insert the blank key.
Select the immobilizer type.
Select car model.
New key programmer, now we will test it if it can start the car.
The key works perfect.
http://obd2all.blogbaker.com/2016/02/05/how-to-program-a-new-dodge-key-with-skp900
