Overblog Tous les blogs Top blogs Automobiles & Véhicules
Suivre ce blog Administration + Créer mon blog
MENU
Publicité
OBD2 Diagnostic Tools
Articles récents

Program Mini Cooper 2014 CAS3 Key by Autel IM608

25 Juin 2019 , Rédigé par JTAC Publié dans #autel im608

Here's the step-by-step key programming procedure for Mini Cooper 2014 Cas3 with Autel MaxiIM IM608.
 
 
Select IMMO->MINI->Auto Detect VIN-> Mini (Europe)->Smart Mode
autel-im608-mini-cooper-cas3-1
 
autel-im608-mini-cooper-cas3-2


IM608 will automatically scan the immobilizer system, engine system, transmission system
autel-im608-mini-cooper-cas3-3

Press OK to continue
Select Key Learning function
autel-im608-mini-cooper-cas3-4
 
Autel IM608 read vehicle and ecu information
autel-im608-mini-cooper-cas3-5
 
This is a MINI R56 CAS3
Confirm information and press OK to continue
 
Going to generate dealer key
Add key and all keys lost are both available for current CAS
Key learning process requires network to obtain data. Enable WiFi connection.
autel-im608-mini-cooper-cas3-6
 
Remove the key from the ignition switch. If it is a smart key, take the key out of the car.
autel-im608-mini-cooper-cas3-7

Reading key information
Connect to internet to obtain data
Read key information success.
Backup original key data
autel-im608-mini-cooper-cas3-8

Save key data
autel-im608-mini-cooper-cas3-9

Press OK to continue
MaxiIM IM608 will key numbers and positions, select an available key position (i.e Key4) and press Programmer Generation Key
autel-im608-mini-cooper-cas3-10

Choose key type, here Semi-smart key
autel-im608-mini-cooper-cas3-11

Connect the IM608 to the XP400 programmer and put the new key into the XP400 programmer card slot
autel-im608-mini-cooper-cas3-12

Writing key in process
autel-im608-mini-cooper-cas3-13

Generate dealer key success
Insert the key into the ignition switch to start the car once.
If the vehicle cannot be started, or the ELV is displayed on the instrument, please synchronize the ELV or DME according to the situation
autel-im608-mini-cooper-cas3-14

Program new smart key success.
autel-im608-mini-cooper-cas3-15

Done.
www.obdii365.com
Lire la suite
Publicité

How to use CGDI MB to Program Benz CLA 2014 All Keys Lost?

18 Juin 2019 , Rédigé par JTAC Publié dans #CGDI Prog

New test report:  Programming CLA 2014 with EIS A246 ALL KEY LOST with CGDI MB success in 6 minutes including password calculation.
 
Model: Mercedes CLA 2014 S A264
Devices to program: CGDI Prog MB and AC adapter for quick data acquisition
 
Step-by-step procedure:
Step 1: Calculate password
Connect AC adapter with CGDI MB and EIS
cgdi-mb-a246-all-key-lost-1
 
Read EIS data
cgdi-mb-a246-all-key-lost-2
 
Then go to Compute Password- Copy key without key- Collect data-OBD mode
cgdi-mb-a246-all-key-lost-3
 
Insert the simulation key into EIS in 30s
CGDI MB AC Adapter collects data very fast
cgdi-mb-a246-all-key-lost-4
 
Save key file
cgdi-mb-a246-all-key-lost-5
 
Upload the data to calculate password
cgdi-mb-a246-all-key-lost-6
 
Upload data successfully, press Query Results 
cgdi-mb-a246-all-key-lost-7
 
Calculate password success. Copy the pass
 
 
Step 2: Generate Key File
Go to EIS, read EIS data
cgdi-mb-a246-all-key-lost-8
 
Paste password here
cgdi-mb-a246-all-key-lost-9
 
cgdi-mb-a246-all-key-lost-10
 
Save new EIS data
cgdi-mb-a246-all-key-lost-11
 
Go to Generate Key File
cgdi-mb-a246-all-key-lost-12
 
Load EIS data just saved
cgdi-mb-a246-all-key-lost-13
 
Choose key file format V51 and Generate key file
cgdi-mb-a246-all-key-lost-14
 
Key successfully calculated. Save them
 
Step 3: Write Key
Now go to write new key with CGDI MB
Select Read/Write Key function- Read Key/Chip
cgdi-mb-a246-all-key-lost-15
 
Insert new key into CGDI Prog
It is a blank key. Press Open/Write 
cgdi-mb-a246-all-key-lost-16
 
Choose common BE key format V51
cgdi-mb-a246-all-key-lost-17
 
Choose a key position
cgdi-mb-a246-all-key-lost-18
 
Write key success
cgdi-mb-a246-all-key-lost-19
 
New key is not activated until we insert it in EIS
cgdi-mb-a246-all-key-lost-20
 
Done.
Lire la suite

Autel IM608 XP400 Programmer ECU MCU EEPROM Chip List

16 Juin 2019 , Rédigé par JTAC Publié dans #autel im608

Autel MaxiIM IM608 XP400 programmer is able to read and write MCU, ECU, EEPROM data, MC9S12 Encrypted Chip.
Here's the chip list of XP-400 (keep updating)
 

EEPROM Read/Write Transponder Coverage
 
Chip Type
Name
Chip Type
Name
ATMEL
AT24C01
ATMEL
AT24C1024
ATMEL
AT24C02
ATMEL
AT24C128_1.8
ATMEL
AT24C04
ATMEL
AT24C256_1.8
ATMEL
AT24C08
ATMEL
AT24C512_1.8
ATMEL
AT24C16
ATMEL
AT24C01A
ATMEL
AT24C32
ST
ST24x01/ST25x01
ATMEL
AT24C64
ST
ST24x02/ST25x02
ATMEL
AT24C128
ST
ST24x04/ST25x04
ATMEL
AT24C256
ST
ST24x08/ST25x08
ATMEL
AT24C512
ST
ST24x16/ST25x16
ST
M24C01
ATMEL
AT25640
ST
M24C03
ATMEL
AT25128
ST
M24C04
ATMEL
AT25256
ST
M24C08
ATMEL
AT25512
ST
M24C16
ATMEL
AT25010_1.8
ST
M24C32
ATMEL
AT25020_1.8
ST
M24C64
ATMEL
AT25040_1.8
FAIRCHILD
NM24C16U
ATMEL
AT25080_1.8
FAIRCHILD
NM24C16UT
ATMEL
AT25160_1.8
FAIRCHILD
NM24C17U
ATMEL
AT25320_1.8
FAIRCHILD
NM24C17UT
ATMEL
AT25640_1.8
MICROCHIP
85C72
ATMEL
AT25128_1.8
MICROCHIP
85C82
ATMEL
AT25256_1.8
MICROCHIP
85C92
ST
M95010
NXP
PCF8582C
ST
M95020
NXP
PCF8594C
ST
M95040
NXP
PCF8598C
ST
M95080
ATMEL
AT25010
ST
M95160
ATMEL
AT25020
ST
M95320
ATMEL
AT25040
ST
M95640
ATMEL
AT25080
ST
M95128
ATMEL
AT25160
ST
M95256
ATMEL
AT25320
ST
M95512
MICROCHIP
25xx040
NATIONAL
NM93C13
MICROCHIP
25xx080
NATIONAL
NM93C14
MICROCHIP
25xx320
NATIONAL
NM93C14TM8
MICROCHIP
25xx640
MICROCHIP
93C46X
MICROCHIP
25xx040_TS
MICROCHIP
93C46A
MICROCHIP
25xx160
MICROCHIP
93C46
MICROCHIP
25xx320_TSS OP
MICROCHIP
93C46AX
MICROCHIP
25xx640_TSS OP
MICROCHIP
93C46BX_93C46 CX
CATALYST
CAT25C01
MICROCHIP
93C56A
CATALYST
CAT25C02
MICROCHIP
93C56
CATALYST
CAT25C04
MICROCHIP
93C66A
CATALYST
CAT25C08
MICROCHIP
93C66
CATALYST
CAT25C16
MICROCHIP
93C76A
CATALYST
CAT25C32
MICROCHIP
93C76
CATALYST
CAT25C64
MICROCHIP
93C86A
CATALYST
CAT25C128
MICROCHIP
93C86
CATALYST
CAT25C256
ATMEL
AT93C46A
ST
M35080
ATMEL
AT93C46
XICOR
X5043
ATMEL
AT93C46R
XICOR
X5045
ATMEL
AT93C56
XICOR
X25043
ATMEL
AT93C57
XICOR
X25045
ATMEL
AT93C66
MICROCHIP
93C06
ATMEL
AT93C76
ATMEL
AT93C86
SONY
CXK1011
NATIONAL
NM93CS06
SONY
CXK1012
NATIONAL
NM93CS46
SONY
CXK1013
NATIONAL
NM93CS56
Seiko
S_24H30
NATIONAL
NM93CS66
Seiko
S_24H30_SOP8
FAIRCHILD
FM93CS46T
Seiko
S_24H45
ST
M93C46
Seiko
S_24H45_SOP8
ST
M93C56
Seiko
S_24S30
ST
M93C66
Seiko
S_24S45
ST
M93C76
TOSHIBA
TC89101
ST
M93C86
TOSHIBA
TC89102
ST
M93S46
TOSHIBA
TC89121
ST
M93S56
TOSHIBA
TC89122
ST
M93S66
Xicor
X24C44
ATMEL
AT59C11
TMC
TMC93LC56
ATMEL
AT59C22
TMC
TMC93LC57
ATMEL
AT59C13
TMC
TMC93LC66
OKI
MSM16911
TMC
TMC93LC86
TMC
TMC93LC46


IM608 MCU/ECU Read/Write Transponder Coverage


Chip Type
Name
Chip Type
Name
FREESCALE
MC9S12DG128
FREESCALE
MC9S12DJ64
FREESCALE
MC9S12DG256
FREESCALE
MC9S12DT128
FREESCALE
MC9S12DT256
FREESCALE
MC9S12XDP512
FREESCALE
MC9S12XET512
FREESCALE
MC68HC08AZ60
FREESCALE
MC68HC(9)08AB16A
FREESCALE
MC68HC908GR16A
FREESCALE
MC68HC(7)05X32
FREESCALE
MC68HC705E6
FREESCALE
MC68HC11E9
FREESCALE
SAK-TC1766
FREESCALE
SAK-TC1793
FREESCALE
SAK-TC1796
FREESCALE
SAK-TC1797
FREESCALE
 

www.obdii365.com

http://www.obdii365.com/service/autel-im608-eeprom-ecu-mcu-list.html

Lire la suite

How to Calculate Dodge RAM 3500 Pin Code with Autel IM608 via OBD

14 Juin 2019 , Rédigé par JTAC Publié dans #autel im608

The Autel MaxiIM IM608 makes Chrysler/Dodge/Jeep Key programming easy as can be. No longer having to read EEPROM Data or pay to use PIN Pullers.

Car model example: Dodge RAM 3500 Pickup 2011


Go to Immobilizer-Dodge-Smart Mode

autel-im608-dodge-pin-code-1


autel-im608-dodge-pin-code-2


Turn on ignition switch If it is old pre-2006 model, please select "Manual Selection" or "System Selection"

autel-im608-dodge-pin-code-3

Select key type, here choose Knob-style smart key

autel-im608-dodge-pin-code-4
Switch ignition off and then on again, make sure engine is off
autel-im608-dodge-pin-code-5
Autel IM608 retrieved 4-digit Dodge RAM 3500 pin code success.
autel-im608-dodge-pin-code-6
 
I also done with a 2017 Jeep Patriot. Pulled pin no problem.
 
Lire la suite
Publicité

How to read Land rover RFA 1M12S EEPRO with CG Pro

13 Juin 2019 , Rédigé par JTAC Publié dans #cg pro

CG Pro 9S12 programmer will read Land Rover:
EWS  ST12   3L40K/4L40K/5L40K
RFA   9S12XEQ384      (1M12S 2M12S 1M53J 2M53J ) 9S12XET512  ( 3M53J  2M53J 1M53J).

Here we tested on RFA 1M12S successfully 
Require DB25 adapter 

Locate 1m25S eeprom chip
Follow wiring diagram to connect DB25 adapter
Then connect DB25 connector with CG Pro


You can check 1M12S MC9S12XEQ384 wiring diagram from CGPro software: Immobilizer-Jaguar/Land rover-RFA 1M12S EEPROM-Diagram


Press Read

Read eeprom success

Save eeprom data

www.obdii365.com

Lire la suite

How to solve CGDI Prog MB Load File Failed Error?

12 Juin 2019 , Rédigé par JTAC Publié dans #CGDI Prog

Here’s the final solution to CGDI MB key programmer error: “Load File Failed, error code: 27E1” (shown picture below)
cgdi-mb-load-file-failed
 
Possible reasons that cause the error:
1).  Device fell on the ground and damaged
2).  Take apart the CGDI main unit manually
CGDI Prog MB host is equipped with an encrypted battery. If you disassemble the programmer, the encrypted battery will power off automatically.  BenzMonster software refuses to run properly.
What is more, the battery cannot be purchased separately nor installed by yourself.
The ONLY solution is to send CGDI back to repair.
 
Note:
Always read CGMB label and directions carefully before beginning use.
Lire la suite

How to Add Skoda Rapid 2017 MQB Key with Lonsdor K518ISE

10 Juin 2019 , Rédigé par JTAC Publié dans #Lonsdor K518

Report:
Skoda Rapid Spaceback 2017 Add key success with Lonsdor K518ISE key programmer
Under Subscribed menu
Select Immobilizer->VW->IMMO4->Select IMMO manually->MQB-35XX (Continental/VDO)->Immobilizer
Photo attached:
lonsdor-k518-2017-Skoda-Rapid-mqb-1
 
lonsdor-k518-2017-Skoda-Rapid-mqb-2
 
lonsdor-k518-2017-Skoda-Rapid-mqb-3


lon

Lire la suite

Toyota Techstream V14.10.028 Free Download and Installation

6 Juin 2019 , Rédigé par JTAC Publié dans #Toyota techstream

Latest version V14.10.020 Toyota TIS Techstream has been tested and verified working on issue by obdii365.com engineer.
 
 
Software version: V14.10.028
(Crack version. No Activation)
Operation system: Windows 7 32 bit
Toyota Teschstream 14.10.028 has been tested OK with:
 
techstream-v14-10-028-software
 
Free Download Toyota Techstream V14.10.028 Software
 
How to install Toyota Techstream 14.10.028 software?
Step 1: Install Setup
Open software CD
install-toyota-techstream-v14-10-028-sw-1

Open Techstream_V14.10.028 folder
install-toyota-techstream-v14-10-028-sw-2

Copy and paste Techstream_SetupNA_V14.10.028 to desktop
Run Techstream setup on desktop
install-toyota-techstream-v14-10-028-sw-3

Select setup language
install-toyota-techstream-v14-10-028-sw-4

Install Techstream InstallSheild Wizard
Press Next
Accept license agreement
install-toyota-techstream-v14-10-028-sw-5

Enter customer information, User Name: AADD, Company name: toyota, press Next
install-toyota-techstream-v14-10-028-sw-6

Install the program
install-toyota-techstream-v14-10-028-sw-7

Finish
 
Step 2: Install driver
install-toyota-techstream-v14-10-028-sw-8

Run MVCI Driver for Toyota-Cable 2.0.1
install-toyota-techstream-v14-10-028-sw-9

Install Mini VCI driver for Toyota TIS, press Next
install-toyota-techstream-v14-10-028-sw-10

Ready to install
install-toyota-techstream-v14-10-028-sw-11

Finish driver installation
 
Step 3: Crack Techstream
Open Techstream software on the desktop
install-toyota-techstream-v14-10-028-sw-12

If windows gives a Java Runtime error, press No to ignore.
Launch Techstream 14.10.028 software
install-toyota-techstream-v14-10-028-sw-13

If techstream requires a registration key, press Cancel
install-toyota-techstream-v14-10-028-sw-14

Select Setup tab->VIM Select, select interface: Xhorse-MVCI
Open readme.txt on software CD
install-toyota-techstream-v14-10-028-sw-15

Copy Techstream.exe”/395070/VM:1
Right click Techstream Properties on desktop
install-toyota-techstream-v14-10-028-sw-16


install-toyota-techstream-v14-10-028-sw-17
 

Replace MainMenu.exe by Techstream.exe”/395070/VM:1 in Target area
install-toyota-techstream-v14-10-028-sw-18

Then Apply
 
Step 4: Install Device Driver
Connect Mini VCI J2534 cable with laptop
install-toyota-techstream-v14-10-028-sw-19

Installing device driver software
install-toyota-techstream-v14-10-028-sw-20

Open MVCI Firmware Update Tool
Read Device Info
Device connected
 
Step 5: Run Techstream
Open Techstream software on the desktop
Initializing USB communication
install-toyota-techstream-v14-10-028-sw-21

Read vehicle information and confirm
Start diagnose vehicle
install-toyota-techstream-v14-10-028-sw-22


install-toyota-techstream-v14-10-028-sw-23
 
 
Lire la suite
Publicité

CGDI MB Basic Edition vs. Advanced Edition

5 Juin 2019 , Rédigé par JTAC Publié dans #CGDI Prog

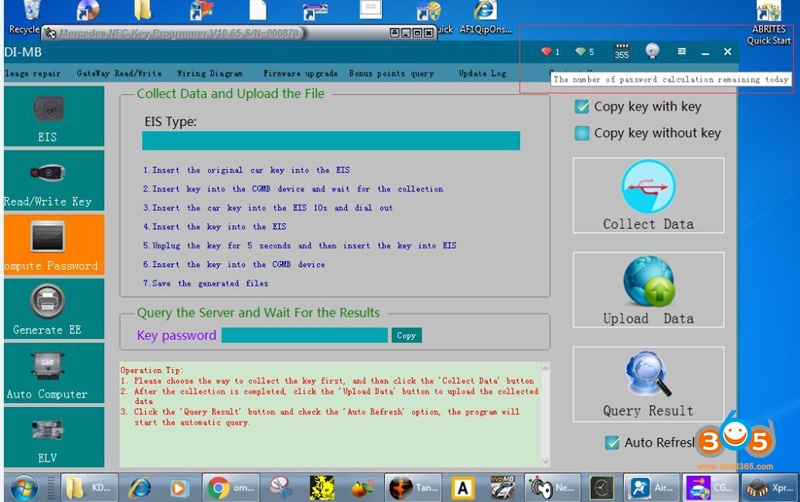
Users should download CGDI software and provide device Serial Number to activate the CGDI Prog MB in the past.  But now CGDI has changed the activation method.


How to activate CGDI MB key programmer?

cgdi-prog-mb-new-activation-1


1). Open CGDI MB software, select "Online Store" tab

cgdi-prog-mb-new-activation-2


2) The next screen will prompt device activation status. This device has not been activated.
Select service version: Basic version or Advanced version.
Basic Edition: 
Only 1 password calculation per day.
Activation will receive a free subscription service for 12 months, free renewal.
Advanced Edition:
Users enjoy 2 password calculations per day
Activation will receive a free subscription service for 6 months, renewal 50 yuan/month.

cgdi-prog-mb-new-activation-3


3). Select the version you desired. Press "Activate"
Note: Once select your version. It cannot be changed after activation. I.e The basic version cannot be changed to advanced version.

http://www.obdii365.com/wholesale/cgdi-prog-benz-key-programmer.html

Lire la suite

CG Pro 9S12 V2.1.3.0 adds Lots of Chips and IMMO Models

4 Juin 2019 , Rédigé par JTAC Publié dans #cg pro

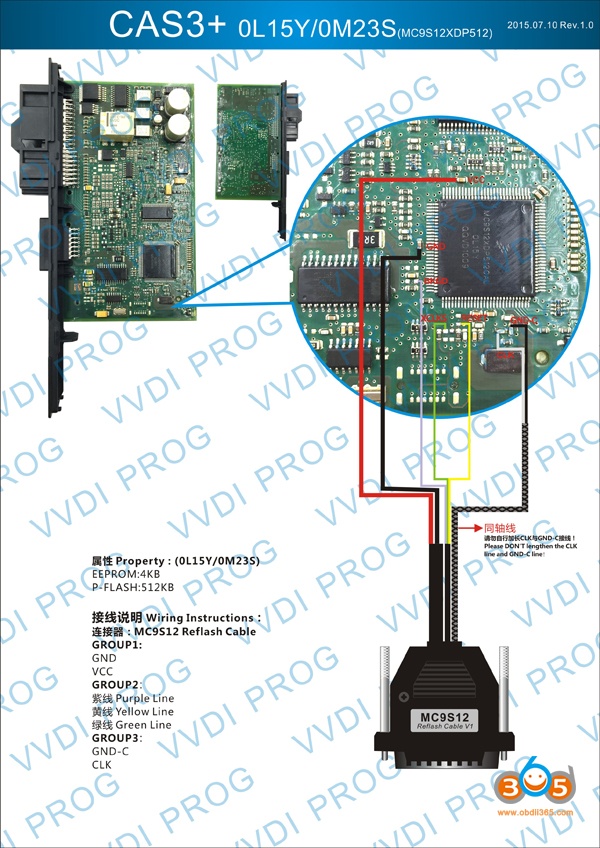
Good news!!! CG Pro 9S12 Programmer released a big update on June 5th, 2019.   CG-Pro V2.1.3.0 software adds lots of chip types, Benz EIS-906 (ST12) IMMO and lots of key generation models, i.e Ford,  Jaguar, Chevrolet, Hyundai, Kia, Mazda, Kawasaki, Mitsubishi, Subaru and Suzuki.


CG-Pro V2.1.3.0  NEW
(2019.06.05)
 
1.Add Benz Immobilizer
Benz EIS-906 (ST12)
 
2.Add Dashboard type
Ford FOCUS 5M5T10849ER
 
3.Add JLR Intelligent Computer
Jaguar / Land Rover RFA-SPC560B60L3(DFLASH) 
Jaguar / Land Rover RFA-SPC560B60L3(SHADOW) 
 
4.Others
Benz S350 - Left Backdoor Module
VW Golf-6 Radar module
 
5. Add following Chips
Motorola - 9S12 
9S12XD64
9S12XD128
9S12XDG128
9S12XD256
9S12XDQ256
9S12XDT256
9S12XDG256
9S12XDT384
9S12XS64
9S12XS128
9S12XS256
9S12D32
9S12DP512
9S12DJ512
9S12DT512
Freescale - MAC7XXX
MAC7241
MAC7242
ST - SPC
SPC560B54L3
SPC560B60L3
Infineon
XC2361A-56F
XC2361A-72F
XC2336A-56F
XC2336B-40F
 
6. Add Chips decrypt (Automatic identification of whether decryption is required)
Motorola - 9S12 
9S12H128 decrypt
9S12H256 decrypt
9S12K128 decrypt
9S12K256 decrypt
9S12XD64 decrypt
9S12XD128 decrypt
9S12XDG128 decrypt
9S12XD256 decrypt
9S12XDQ256 decrypt
9S12XDT256 decrypt
9S12XDG256 decrypt
9S12XDT384 decrypt
9S12D32 decrypt
9S12DP512 decrypt
9S12DJ512 decrypt
9S12DT512 decrypt
9S12C32 decrypt
9S12C64 decrypt
9S12C96 decrypt
9S12C128 decrypt
9S12GC16 decrypt
9S12GC32 decrypt
9S12GC64 decrypt
9S12GC96 decrypt
9S12GC128 decrypt
 
7. Add key generation models
Aston Martin DB9 _2004_77014 
Ford Escape_2001(77014) 
Ford Explorer_2004-(77014) 
Ford Fiesta_93C56 
Ford Fiesta_95P04 
Ford Fiesta_2007(95160) 
Ford Fiesta_2009(9S12) 
Ford Focus_1998_95P04_DST40 
Ford Focus_1998_77012_DST40 
Ford Focus_1998_77014_DST40 
Ford Focus_2007_93C56_DST40 
Ford F_series_100_93C56 
Ford Fusion_2007_93C56 
Ford Fusion_2007(95160) 
Ford Maverick_77014 
Ford Mondeo_2000_77014 
Ford Mondeo_2001_95P04 
Ford Mondeo_2001_77014 
Ford Ranger_93C56 
Ford Taurus_2000_77014 
Ford Transit_2000_95P04 
Ford Transit_2000_77014 
Ford Transit_2003_77014 
Ford Transit Connect_95P04 
Ford Explorer 2007 93C86 
Ford Fiesta 2002...2008 
Ford Fusion 2002 93C86 
Jaguar S-Type_MC68HC11 
Jaguar S Type MC68HC912 
Jaguar X-Type MC68HC912 
KTM 690 990 1190 9S12 DST40 
LDV Convoy 2000 95P04 
Renault Megane 2000 68HC705 4D 4E 
Chevrolet  Epica  2003  68HC705 
Chevrolet  Evanda  2003  68HC705 
Chevrolet   Lacetti 2005 ST7 
Lincoln LS 2000 MC68HC11 
Chang'an benben 95040 
Daewoo Lacetti 2006 ST7 
FAW Group Besturn B50 95040 
FAW Group Besturn B70 95040 
Hyundai Accent 2004 93C56 
Hyundai  Coupe 2005 93C66 
Hyundai  Elantra 2005 93C66 
Hyundai H1 2001 93C56 
Hyundai H200 2001 93C56 
Hyundai SantaFe 2006 93C56 
Hyundai Sonata 2003 93C56 
Hyundai Starex 2002 93C56 
Hyundai Terracan 2001 93C56 
Hyundai Trajet 2000 93C56 
Hyundai SantaFe 2005 93C66 
Hyundai Sonata 2005 93C66 
Hyundai Tiburon 2005 93C66 
Hyundai Tucson 2005 93C66 
Hyundai Tuscani 2005 93C66 
Infiniti Q45 2001 S29190 
Isuzu KB250D 93C66 4D 
Kawasaki Mitsubishi 21175-0079 24C04 
Kawasaki Mitsubishi 21175-0158 24C04 
Kawasaki Denso 21175-0046 93C66 
Kawasaki Denso 21175-0053 93C66 
Kawasaki Denso 21175-0097 93C66 
Kawasaki Denso 21175-0098 93C66 
Kawasaki Denso 21175-0109 93C66 
Kawasaki Denso 21175-0173 93C66 
Kawasaki Denso 21175-0170 93C66 
Kawasaki Denso 21175-0227 93C66 
Kawasaki Denso 21175-0220 93C66 
Kawasaki Denso 21175-0272 93C66 
Kawasaki Denso 21175-0341 93C66 
Kawasaki Denso 21175-0363 93C66 
Kawasaki Denso 21175-0356 93C66 
Kawasaki Denso 21175-0789 93C86 
Kawasaki Denso 21175-0811 93C86 
Kawasaki Mitsubishi 21175-0017 24C02 
Kia Rio 2001 93C46 
Kia Sorento 2003 93C56 
Kia Sephia 1999 93C46 
Kia Sportage 2001 93C46 
Kia Carnival 2002 93C56 
Kia Magentis 2001 93C56 
Mazda 2 2003 93C56 
Mazda 2 2009 9S12 [DST] 
Mazda 2 2009 93C66 
Mazda 3 Dashboard 93C56 
Mazda 3 Dashboard 93C66 
Mazda 5 93C56 
Mazda 6 93C56,66.24C02 
Mazda 6 2005 93C86 
Lire la suite

Lonsdor KH100 Remote Maker User Manual

3 Juin 2019 , Rédigé par JTAC Publié dans #lonsdor KH100

This is LONSDOR KH100 remote maker user manual:
 
LONSDOR KH100 definition
LONSDOR KH100 how to register
LONSDOR KH100 how to update
LONSDOR KH100 how to use
 
in detail…
 
What is LONSDOR KH100:
The Lonsdor KH100 handheld full-featured key mate and related materials are only used for normal vehicle maintenance, diagnosis and testing, and should not be used for illegal activities. If you use our products to violate laws and regulations, the company does not assume any legal responsibility. This product has certain reliability, but does not exclude the possible losses and damages, the risks arising from this shall be borne by the user, and Lonsdor does not bear any risks and liability.
lonsdor-kh100-remote-maker-manual-1
 
Specification:
Device dimension: 193MM*88MM*24MM
Screen size: 2.8 inch
Screen resolution: 320X240 Battery: 3.7V
2000MAH Power: 5V         500MA
Work temperature: -5℃~60℃
USB: USB-B/charge-data transfer
Connector port: PS2-7PIN OD3.5 7PIN , 1.27 spacing, the 2nd PIN: NC
lonsdor-kh100-remote-maker-manual-2
 
Remote support:
lonsdor-kh100-remote-maker-manual-3


lonsdor-kh100-remote-maker-manual-4
 
 
How to register Lonsdor KH100:
 
Note:      After      booting        the      device,      please       connect       to      WIFI     and      enter      the following     process.
New user
 
① For the first use, please prepare a common call phone or email to help complete
activation process, click OK to start.
② Boot the device and enter registration activation process.
③ Input user name, password. Confirm password, cellphone number or email to obtain verification code. Then input the code to submit registration.
④ Account registered successfully, it will take 5 seconds to bind the device.
⑤ Successful registration, enter the system.
 
Registered userwho has registered Lonsdor products before
 
① For the first use, please prepare a registered call phone or email to help complete
activation process, click OK to start.
② Boot the device and enter registration activation process.
③ Input your registered mobile number or email, password to obtain verification code. Then input the code to submit login.
④ Account login succeeded, it will take 5 seconds to bind the device.
⑤ Successful registration, enter the system.
In addition, users who have already registered Lonsdor’s product can directly choose [registered user] to activate account.
 
How to update Lonsdor HK100:
Enter settings menu
Connect the device to network
Then choose [check for updates]
One-click for online update!
 
 
Read before use:
 
Before use this product, please read this instruction carefully to know how to use it properly.
  • Do not hit, throw, acupuncture the product, and avoid falling, squeezing and bending
  • Do not use this product in damp environment such as bathroom, and avoid it being soaked or rinsed with liquid. Please turn off the product in circumstances when it’s forbidden  to  use,  or  if  it  may  cause  interference  or  danger.
  • Do not use this product while driving a car, so as not to interfere with safety
  • In medical establishments, please follow the relevant regulations. In areas close to medical equipment, please turn off this
  • Please turn off this product near high-precision electronic equipment, otherwise the equipment may
  • Do not disassemble this product and accessories without authorization. Only authorized institutions can repair
  • Do not place this product and accessories in appliances with strong electromagnetic
  • Keep this product away from magnetic equipment. The radiation from magnetic equipment will erase the info/data stored in this
  • Do not use this product in places with high temperature or inflammable air(such as near gas station).
  • When using this product, please comply with relevant laws and regulations, and respect the privacy and legal rights of
 
Read for better use:
lonsdor-kh100-remote-maker-1
 
 
  • Identify Copy
Enter this menu, follow system prompts to operate (as shown).
lonsdor-kh100-remote-maker-2
 
  • Access Control Key
Enter this menu, follow system prompts to operate (as shown).
lonsdor-kh100-remote-maker-3

Identify ID card
lonsdor-kh100-remote-maker-4

Identify IC card
  • Simulate Chip
 
Put KH100’s antenna at the ignition switch(as shown), choose the corresponding chip type to simulate. This device supports below chip types:
①4D                   ②46                   ③48
lonsdor-kh100-remote-maker-5
 
  • Generate Chip
Put below types of chip into the induction slot(as shown), choose the corresponding chip to operate according to the prompts.
This device supports below chip types:
①4D              ②46            ③48              ④T5
⑤7935          ⑥8A            ⑦4C            ⑧Other
lonsdor-kh100-remote-maker-6

Note: some chip data will be covered and locked.
  • Generate Remote
Enter [Generate key]->[Generate remote], choose the corresponding vehicle type to generate remote control(as shown) according to different regions.
lonsdor-kh100-remote-maker-7
 
  • Generate Smart key(card)
 
Enter [Generate key]->[Generate smart key] menu,choose the corresponding vehicle type to generate smart key/card(as shown) according to different regions.
lonsdor-kh100-remote-maker-8


  • Identify Coil
1 Search smart induction area
 
Connect  remote  key  with  remote  connector,  Put  KH100’s  antenna  close  to  the pre-determined position. If inductive signal is identified, the device will continuously make sounds, please check if the position is right(as shown below).
lonsdor-kh100-remote-maker-10

②Detect IMMO
Connect  remote  key  with  remote  connector,  Put  KH100’s  antenna  close  to  key identification coil, and use key to turn ignition ON. When KH100 buzzer beeps, it means signal is detected.
 
 
  • Remote Frequency
 
Enter  this  menu,  put  remote  control  at  the  device’s  induction  area  to  detect  remote frequency.
lonsdor-kh100-remote-maker-11
 
  • Special function
 
Include: detect infrared signal, unlock Toyota smart key, More functions, to be continued…
  • Detect infrared signal
 
Put remote control at the infrared signal detection area, press the remote’s button once. When the light on KH100’s screen is on, it indicates there is infrared signal, otherwise there is no signal(see below pic).
lonsdor-kh100-remote-maker-12


lonsdor-kh100-remote-maker-13
 
P1: signaled                                                     P1: no signal
  • Unlock Toyota smart key
Put in smart key, click OK to operate.
lonsdor-kh100-remote-maker-14
 
Lire la suite

Toyota Auris 93C86 Odometer Correction with Digiprog3

2 Juin 2019 , Rédigé par JTAC Publié dans #digiprog 3

Here's the guide to change mileage on a Toyota Auris with IC 93C86 by using digiprog 3 v4.94.

Need to remove dash

digiprog3-toyota-auris-change-km-1
digiprog3-toyota-auris-change-km-2

Locate EEPROM IC 93c86, connect it with digiprog3 via eeprom clip adapter

digiprog3-toyota-auris-change-km-3

In digiprog 3, select CAR/TRUCK->Toyota->Auris C86

digiprog3-toyota-auris-change-km-4


digiprog3-toyota-auris-change-km-5


digiprog3-toyota-auris-change-km-6


Digiprog prompts to connect with PLUG 1

digiprog3-toyota-auris-change-km-7

It will display current mileage
Manually enter odometer you desired to change

digiprog3-toyota-auris-change-km-8

Writing new mileage

digiprog3-toyota-auris-change-km-9

Select CAR/TRUCK->Toyota->Auris C86 to check if the odometer has changed successfully

digiprog3-toyota-auris-change-km-10

Reinstall instrument cluster to vehicle.

www.obdii365.com

Lire la suite
Publicité

How to use Yanhua Integrated Interface Board for DME and FEM BDC?

30 Mai 2019 , Rédigé par JTAC Publié dans #yanhua mini acdp

Yanhua Tech developed new Mini ACDP integrated interface boards for DME N13 N20 N55 B48 ISN reading and BMW FEM/BDC bench programming.
 
What’s the benefits of the integrated boards?
Simple operation!
Plug and use it directly!
Avoid incorrect connection!
Safe and reliable connection!
yanhua-dme-integrated interface board
 
First of all, check ACDP old DME ISN adapter connection below
Disadvantages:
1. Need to follow the wiring diagram
2.Takes time, less efficient
3.Will cause incorrect connection
yanhua-acdp-old-dme-connection
 
Now with the new integrated  board, it is just plug-and-play, check pictures below
Easy and fast
yanhua-acdp-n55-integrated-interface-board-1


yanhua-acdp-n55-integrated-interface-board-2
 
 
yanhua-acdp-n13-n20-integrated-interface-board-1


yanhua-acdp-n13-n20-integrated-interface-board-2
 
 
Newly updated!! Reading B48 DME ISN via OBD or on Bench!
yanhua-acdp-b48-integrated-interface-board-1


yanhua-acdp-b48-integrated-interface-board-2


yanhua-acdp-b48-integrated-interface-board-3


yanhua-acdp-fem-bdc-integrated-interface-board-1
yanhua-acdp-fem-bdc-integrated-interface-board-2


yanhua-acdp-fem-bdc-integrated-interface-board-3


yanhua-acdp-fem-bdc-integrated-interface-board-4


Lire la suite

Autel MaxiPC Suite adds IM508 IM608 XP400 and XP200

28 Mai 2019 , Rédigé par JTAC Publié dans #autel im608

Good news!!! Autel MaxiPC Suite has been updated to work with the XP400 and XP200.
maxipc-suite-update-xp400-xp200
What does this software do?
 
MaxiPC Suite is an updater program. It is used to update the Autolink tools, MaxiDiag tools, TS tools, and recently added XP Key programming tools.
 
What is the XP400 and XP200?
 
XP adapters are the key programming tools for Autel MaxiIM IM508 and IM608.  IM608 uses XP400, IM508 uses XP200. 
Lire la suite

Toyota TIS Techstream vs. Techstream Lite

27 Mai 2019 , Rédigé par JTAC Publié dans #Toyota techstream

Look here: How to do Toyota ECU reprogramming? using TIS Techstream or Techstream Lite?
toyota-tis-techstream
 
What is TIS Techstream:
 
Techstream 2.0 combines the functionality of TIS and the scantool into a single portable device. With Techstream 2.0, technicians can simultaneously view/analyze on–board vehicle data, browse relevant TIS service documents, and reprogram vehicles all from the driver’s seat via wireless connection to TIS. The Techstream 2.0’s Panasonic CF-31 PC provides a bigger and brighter screen, faster processor, longer battery life, and a bigger keyboard over its predecessor. The Snap-on backpack offers a durable all–in-one package for technicians.
Scantool Diagnostics
Techstream 2.0 offers full support for 1996 – current vehicles marketed in North America. Periodic software updates will be available to support new models. Techstream 2.0 provides quick and easy access to all available systems on the vehicle as well as a one touch vehicle status report (Health Check).
Vehicle Reprogramming
Toyota/Lexus/Scion ECMs can be reprogrammed using the Techstream 2.0 scantool. Techstream 2.0 software version requirements are specified in applicable Technical Service Bulletins (TSBs), which can be accessed with a subscription to this website. Older documents may state to use the TIS Techstream or Diagnostic Tester as being the required tool. Techstream 2.0 techstream is the replacement for the Techstream 1.0 and Diagnostic Tester and can be used for all 1996–current Toyota/Scion/Lexus vehicles marketed in North America.
 
What is Techstream Lite:
 
Techstream Lite allows Techstream diagnostic software to run on your PC (see minimum PC requirements) to service Toyota, Scion, and Lexus vehicles. Techstream Lite is an inexpensive alternative to the full TIS techstream system and provides factory level support for Toyota/Scion/Lexus vehicles.
Scantool Diagnostics
Techstream Lite supports DLC3/J1962 based diagnostic functions on 1996 and later Toyota, Scion, and Lexus vehicles marketed in North America. You must have an active professional level subscription to use Techstream software.
Vehicle Reprogramming
Toyota, Scion, and Lexus ECUs can be reprogrammed using Techstream Lite. Available ECU updates are specified in applicable Technical Service Bulletins (TSBs), which can be accessed with a subscription to this website. You must have an active professional level subscription to access the calibration files.
 
Tis Techstream vs Techstream Lite:
toyota-techstream-tis-vs-lite-version-1


toyota-techstream-tis-vs-lite-version-2
 
 
Toyota reprogramming notes: (IMPORTANT)      
 
It is possible to permanently damage a vehicle controller during the flash reprogramming process. It is especially important to understand that once started, the reprogramming process must not be interrupted, reprogramming devices must not be disconnected and PCs must not be allowed to go into Standby, hibernation or similar power management modes. The information provided herein is intended expressly for use by qualified professional automobile technicians. To prevent damage to your customer’s vehicle and ensure safe service practice, read these materials completely and thoroughly before servicing the vehicle and be sure to follow all instructions.
 
Toyota reprogramming with a J2534 interface:
 
Toyota, Scion, and Lexus ECMs can be reprogrammed with the TIS Techstream, Techstream Lite, Diagnostic Tester, or can also be reprogrammed using a Toyota validated J2534 interface. Vehicle recalibration requires the use of the following:
·    Toyota validated J2534 interface
·    TIS Professional Level Subscription
·    Toyota Calibration Update Wizard software (installed along with Techstream Software)
·    Personal Computer running Microsoft Windows XP/2000 or later operating system
Toyota strongly recommends USING ONLY VALIDATED INTERFACE DEVICES that appear on this list.
Toyota works closely with J2534 interface manufacturers to ensure that their hardware works safely and efficiently with our products. Every device listed on this page has been thoroughly tested and validated on Toyota, Scion, and Lexus vehicles.
 
It is important to understand that only the specific devices, firmware, DLLs and APIs listed here have been tested by Toyota. We do not recommend use of any other J2534 device, firmware, DLL or API that is not listed here. Changes to J2534 hardware/software is outside of Toyota’s control; in some cases, changes made to device hardware/software can negatively impact reprogramming performance. Toyota makes every effort to continue to work with J2534 interface manufacturers to ensure continued product compatibility as our respective products evolve.
 
Toyota J2534 interface:
The cheapest: mini vci cable for Toyota (19.99 usd)
mangoose-ecu-reprogramming
 
The newest: Vxdiag vcx nano Toyota Techstream 14.00.018
vxdiag-toyota-reprogramming
 
The best: J2534 reprogramming tool for universal vehicles
jdiag-j2534-reprogramming
 
Test report: confirmed to work for ECU reprogramming
 
On a side note,
All Toyota J2534 interfaces above come with a decent Tis Techhhstream crack.
Lire la suite