

/image%2F1896381%2F20151209%2Fob_cb2b49_obd365-com.png)
Lonsdor K518ISE Read Ford Focus 2013 Pin Code and Add a Key


How to Solve John Deere Service Advisor Search Engine Error
This is for anyone when he/she runs the John Deere Service Advisor heavy duty diagnostic software, the system appears error message that the search engine module can not be loaded and then the program ends.
NOTE THAT YOU ARE TRYING ANY TRICK ON YOUR OWN RISK.
Optional solutions:
Solution 1:
Run as system administrator, roll back pc date reactivate using activator Then roll date back to normal date if error still renew once again. Been working for me so far.
Note that, don’t know how long it stay working but works im sure someone will have solution for it soon.
Also advice if doing fresh install roll back the date on pc do the install after then install and activations have been done.
Go to task manager look for the service adviser on have it start its tasks in 2030 :save and then reset your pc date should be good for while
Solution 2:
if you set a date before the lightweightidol license expired, start the lightweightidol service, set the real date and start Advisor, it works.
Solution 3:
start advisor. when error comes with “search engine” Close John Deere SA. afterwards set your PC date to feburary 2015. start SA again (run as administrator). it now comes with error on licence. close SA Again. set pc date back to normal. run SA Again. now it Works.
Solution 4:
The search engine error can be solved.
Set back the date, before the expiry date found in Service ADVISOR\SUIR\license.log (august 14 in my case). Start LightweightIDOL service. Set the real date, and Advisor working again.
I made a batch file to simplify it. To make it work Control Panel/Regional/short date format have to be yyyy-mm-dd or you have to modify batch. Maybe you have to modify ServiceADVISOR.exe path too in the batch. Have to run as administrator.
Solution 5:
I have had the same error with ssearch engine connection in JD SA.
reinstalled it twice, changed system date back and forward, run activator. No result for me.
But actually I found the solution for this issue.
Just need to install july update from the post http://mhhauto.com/Thread-John-Deere-Ser…#pid758969
And the error disappeared.
Solution 6:
back date to 08.10.16
install JD SA, restart, activate, mount latest disk you have (05.2016) and install update, for finish get license error, ignore and close, set actualy date, run JD SA -> works fine, install july update
testing today on 3 laptops (Windows 7 and 10)
On a side note: procedure about turning off the updates
don’t know how long it stay working but works im sure someone will have solution for it soon.
Also advice if doing fresh install roll back the date on pc do the install after then install and activations have been done.
goto task manager look for the service adviser on have it start its tasks in 2030 :save and then reset your pc date should be good for while Smile (SO TURN IT OFF IN TASKMANAGER SO IT STARTS 20 30 YEARS FROM NOW!!)
Fresh new installations also work but can be much more complicated sure a patch would be much easier. But it can be done with out a patch so far
In taskmanager I don’t stop any service just put service advisor updater to 2030 to start
also makes sure eculp.ini configurator reads like this
A valid ECULP License has been found
Licenses for the following modes have been found:
TestCell Programming
FinalEOL Programming
Service Programming
ECUCPP Programming Tool
All JD Components were found and properly licensed
JDEcu : Version 1.0 : 01-apr-2021
JDConfig : Version 1.0 : 01-apr-2021
JDData : Version 1.0 : 01-apr-2021
JDIntelHex : Version 1.0 : 01-apr-2021
JDPayloadReader : Version 1.0 : 01-apr-2021
JDPayloadProcessor : Version 1.0 : 01-apr-2021
ECULoaderProgram : Version 1.0 : 01-apr-2021
ECULP_TestCell : Version 1.0 : 01-apr-2021
ECULP_FinalEOL : Version 1.0 : 01-apr-2021
ECULP_Service : Version 1.0 : 01-apr-2021
ECULP_TestCell_OEM : Version 1.0 : 01-apr-2021
ECULP_FinalEOL_OEM : Version 1.0 : 01-apr-2021
ECULP_Service_OEM : Version 1.0 : 01-apr-2021
ECULP_ECUCPP : Version 1.0 : 01-apr-2021
ECULP_Direct_EOL_Output : Version 1.0 : 01-apr-2021
ECULP_OEM_DISTRIBUTOR : Version 1.0 : 01-apr-2021
Service_ADVISOR_Ag : Version 1.0 : 01-apr-2021
Service_ADVISOR_CF : Version 1.0 : 01-apr-2021
The last – if all tips/solutions above don’t work for you,
John Deere Service Advisor 4.0 Crack – No Search Engine Error
Look here: http://www.obdii365.com/wholesale/john-deere-service-advisor-edl-v2-scanner.html
What's the benefit of INPA K+DCAN cable switch Pin 7 &8


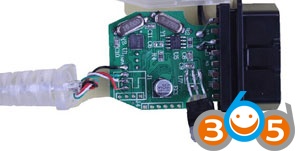
8 pin for K-LINE communication (old DCAN cables cannot do it) for BMW from 1998 to 2008
Upload images…
- Use an adapter (such as the one sold by One Stop electronics) which internally bridges pins 7 & 8 or…
- Mount a small switch on the OBD plug end of your adapter, which can bridge (for K line) or separate (for DCAN) the connection between pins 7 & 8.
How to use MPPS cable to do ECU checksum
MPPS V18 ECU Checksum Tutorial:
What is a checksum:
A checksum is a block of digital data that is used to verify the contents is of the memory is correct. Upon modifying the data the correct checksum must be calculated to ensure proper operation of the Engine Control Unit (ECU).
What happens if I checksum a file that was already checksummed:
It will not cause a problem if a file is checksummed twice. In most cases this will result in zero changes as the checksum is already made for the file. Although in a very small number of instances the MPPS Checksum may be slightly different than a checksum calculated using a differnt method. In This case it will also be ok to checksum the file a second time.
What you should know before MPPS checksum:
MPPS does not support Checksums in some cars models/ECUs , if it is not displayed under write option for your car model&ECU then the Checksum is not supported. If you cannot do it in WinOLSthat’s mean that checksum module is missing or not installed.
your best option is to compress your original file and modified file into RAR archive if you can and post this file on this forum . someone should check it for you.
remember when you will write your modified file into ECU make sure you have battery fully charged or better connect a battery charger if you can and observe voltage is above 12v in LHS corner in your MPPS software if you don’t have a charger,
do not open doors just wait couple of minutes till MPPS will finish write cycle, take time and do what software instruct you to do regarding ignition.
How to use MPPS cable for checksum:
Select the correct ECU TYPE
Press the checksum button
Select the modified file that you wish to checksum

Select the ORIGINAL FILE IF PROMPED

Select the file name to save the checksummed file to

You now have a checkummed file that you can WRITE to the ECU.
Have fun!
http://www.obdii365.com/service/mpps-ecu-chip-tuning-checksum-user-manual-97062.html
How to correct checksums with WinOLS tuning software
Winols 1.5 cracked download: (tested 100%)


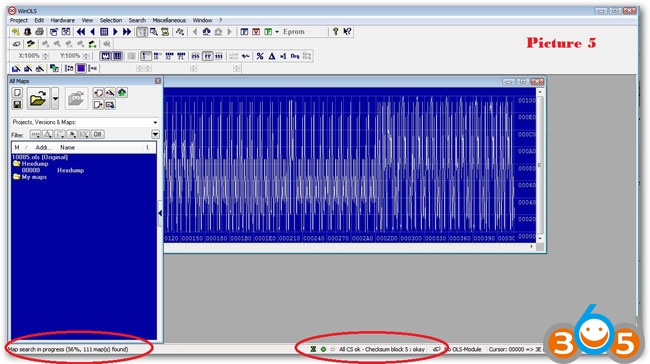
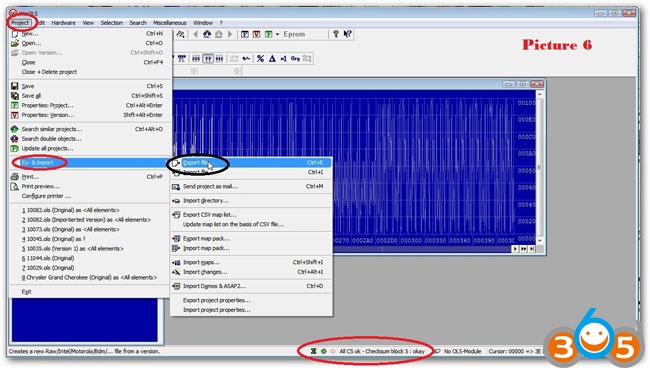
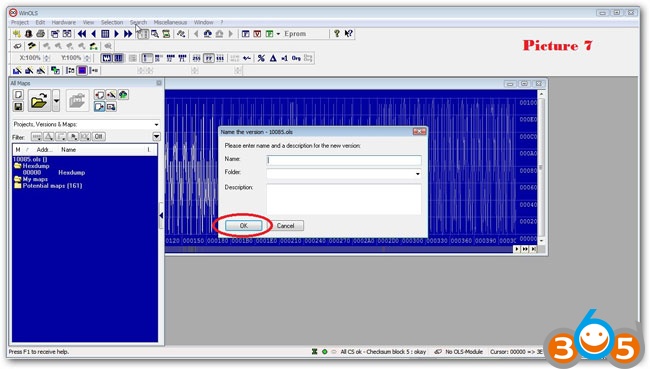


- First, drag and drop the original untouched file into Winols in the same way as in the pictures. When it has finished loading the original file …then
2. you can now drag and drop your modified file ontop of the original file you already loaded into Winols.
3. Now you can follow the checksum procedure steps exactly as described in the pictures, correcting modfile checksums.
when you find the words “noread” write over them with FFFFFF, save changes and try again with Winols
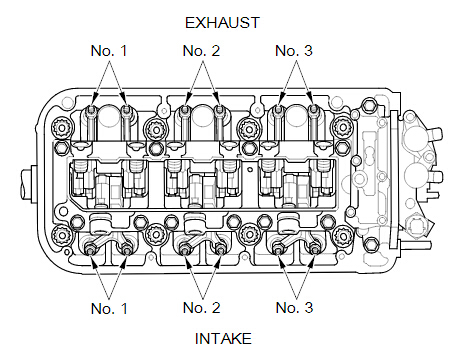
How to do Honda Value Adjustment with HDS HIM
Question: Have you found the Honda tutorial for valve adjustment?
NOTE: Connect the Honda HDS HIM diagnostic system to the DLC, and monitor ECT SENSOR 1. Adjust the valve clearance only when the engine coolant temperature is less than 100 °F (38 °C).
1.Remove the cylinder head covers.
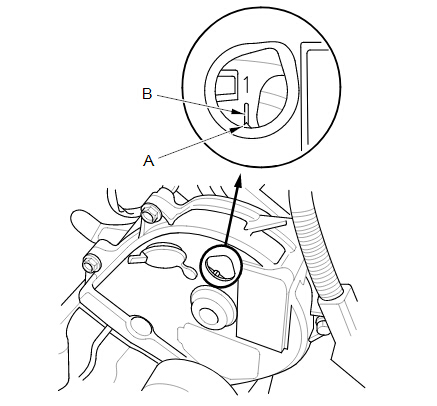
2.Set the No. 1 piston at top dead center (TDC). Align the pointer (A) on the front upper cover with the
No. 1 piston TDC mark (B) on the front camshaft pulley.
3.Select the correct feeler gauge for the valve clearance you are going to check.
Valve Clearance
Intake:
0.20-0.24 mm (0.008-0.009 in)
Exhaust:
0.28-0.32 mm (0.011-0.012 in)
REAR
FRONT
4.Insert the feeler gauge (A) between the adjusting screw and the end of the valve stem on the No. 1 cylinder, and slide it back and forth; you should feel a slight amount of drag.
INTAKE

EXHAUST

5.If you feel too much or too little drag, loosen the locknut, and turn the adjusting screw until the drag on the feeler gauge is correct.
INTAKE

EXHAUST
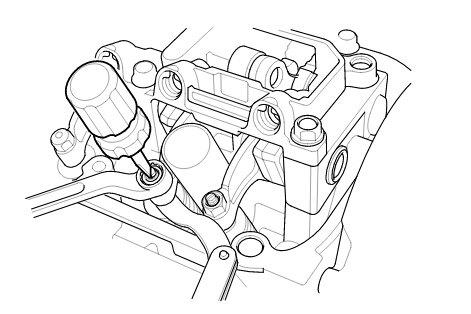
6.While holding the adjusting screw with the screw driver, tighten the locknut, then recheck the clearance. Repeat the adjustment, if necessary.
Specified Torque
No. 1, No. 2, No. 3, and No. 4 cylinders:
20 N·m (2.0 kgf·m, 15 lbf·ft)
Apply new engine oil to the nut threads.
No. 5 and No. 6 cylinders:
14 N·m (1.4 kgf·m, 10 lbf·ft)
Apply new engine oil to the nut threads.
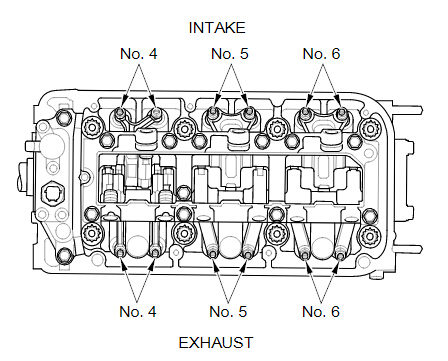
7. Rotate the crankshaft clockwise. Align the pointer (A) on the front upper cover with the No. 4 piston TDC mark (B) on the front camshaft pulley.

8.Check and, if necessary, adjust the valve clearance on the No. 4 cylinder.
9.Rotate the crankshaft clockwise. Align the pointer (A) on the front upper cover with the No. 2 piston TDC mark (B) on the front camshaft pulley.

10.Check and, if necessary, adjust the valve clearance on the No. 2 cylinder.
11.Rotate the crankshaft clockwise. Align the pointer (A) on the front upper cover with the No. 5 piston TDC mark (B) on the front camshaft pulley.

12.Check and, if necessary, adjust the valve clearance on the No. 5 cylinder.
13.Rotate the crankshaft clockwise. Align the pointer (A) on the front upper cover with the No. 3 piston TDC mark (B) on the front camshaft pulley.

14.Check and, if necessary, adjust the valve clearance on the No. 3 cylinder.
15.Rotate the crankshaft clockwise. Align the pointer (A) on the front upper cover with the No. 6 piston TDC mark (B) on the front camshaft pulley.

16.Check and, if necessary, adjust the valve clearance on the No. 6 cylinder.
17. Install the cylinder head covers.
Cummins Insite 8.0.2 Keygen Unlock Free Download
Here, download Cummins Insite 8.0.2 old version for free and Insite 8.2.0.184 tested version for security.
Free version Cummins Insite 8.0.2:
FREE!!! BUT NOT TESTED – UNKNOWN SECURITY
Insite 8.02 v1 .iso download:
https://mega.nz/#!1b5AHJ5R!emDkoD01Jous0jaVA-mBYglqr8ITqzZIQH7Aw07u9S4
Keygen unlock.rar download:
https://mega.nz/#!wXYGRYqD!fyrH4wxyhgA0BlMa9gEdskb8pfKlOSj2gfh3OdSZmDw
Incal Insite 8.x download:
https://mega.nz/#F!9HRUmRjZ!pKffYrbyobkDUw8e2Fbehg
FULL PACKAGES: INSITE INSTALLATION + KEYGEN UNLOCK + PATCH FILES + INCAL FOR INSITE 8.
What is Cummins INSITE:
Cummins INSITE is a Windows software application that works with Cummins Electronic Control Modules (ECMs) to diagnose engine problems, store and analyze historical information about an engine, and modify parameters of engine operation. Cummins INSITE also allows you to download an ECM calibrations to working with Cummins INCAL.
Insite 8.x Laptop requirements:
- O.S.: Windows XP, Windows Vista, Windows 7, Windows 8, Windows 8.1
• CPU: Pentium/Athlon 2 GHz or higher
• RAM: 512 MB of system memory
• Hard Drive: 10 GB of available space
• Optical Drive: DVD-ROM
INSITE 8.0.2 Released Notes:
Installations upgrade capability
Upgrade from INSITE 8.0.1
Work Orders
Images and Templates
Beginning with INSITE version 8.0.1, images or templates imported from later versions of INSITE will be highlighted in the Work Order window.
For Example: If templates or images from INSITE 8.0.2 are imported into INSITE 8.0.1, those images or templates will be highlighted. When hovering over those images or templates, an informative message will be displayed.
ECM Image Analyzer
To open this new feature Right-Click on any image and select ‘Analyze Image’ to open. This can be used to view key features of an image and contains improved graphics. The current feature, or all features, can be exported to Adobe (pdf) or Excel (xlsx) file formats.
For Example: Duty Cycle Monitor will show a 3-D, multi-colored graph, and it can be rotated using the mouse.
New Features and Parameters
***These will only be displayed if they are supported by the calibration.
Crankcase Pressure Speed Derate
This feature provides the ability to enable the crankcase pressure speed derate as partof the Engine Protection special feature.
Inducement Override Switch
This feature provides the ability to enable the Inducement Override Switch.
Engine Oil Level
This feature provides the ability to set the Engine Oil Level sensor type.
Driver Reward Distance Reset
This feature expands Driver Reward to include the ability to reset Driver Reward every time the engine is turned off as well as to configure the distance the driver reward can be applied.
Advanced ECM Data
***These will only be displayed if they are supported by the calibration.
Engine Protection and Engine Protection Settings
These features have been updated to include Crankcase Pressure, Boost Pressure Differential and Bank Vacuum Detection information.
Fuel or Timing System Table Reset Component Replacement
This feature allows the adaptive learning table values to be reset after fuel or engine timing
components have been replaced.
Operating Systems Supported
- Windows® 7 32-bit and 64-bit
- Windows® 8 32-bit and 64-bit
http://www.obdii365.com/producttags/cummins-insite-820184.html
OBDSTAR X300 Adds Peugeot Citroen DS All Key Lost Pin Code Reading
OBDSTAR new software (All key lost and pincode reading) for PSA
All users of OBDSTAR X300 PRo3, Key Master, X300 DP and Key Master DP as detailed below
Pin Code reading
SIEMENS D76F0018+95160 K Line (BSI-E0X-00/BSI-F0X-00)
SIEMENS 1L00M+95128-95256CAN (BSI-S0X-00)
CONTINENTAL SC667050+95256 CAN (BSI-Q0X-00)
JC easyCAN4+29LV400BB+95128 CAN (BSI2004-H0X)
JC easyCAN4F1M-32-95128 CAN (BSI04EV-K0X)
JC SPC560B60+95128 CAN (BSI04EV2-KEX)
VALEO 2M48H+14C128 CAN (BSIEV-X0X-00)
VALEO 4L00M+95128-25128 CAN (BSI2004-P0X-00)
VALEO SC667152+95256 CAN (BSI-N0X)


How to set up cheap Mangoose Pro GM cable on Saab 9-3


Xprog m read BMW E38 EWS3 2D47J mask
It is a BMW E38 year 1997 with EWS3 immobilizer. So, 1997, e38, as I understood there M52 with 1 VANOS.
We are going to read the great and terrible MC68HC11EA9 with a 2D47J mask.


The car does not start.
When connected to the immo, I immediately got a very fast heating of the ELMOS chip on the board, up to 60 degrees and above (as indicated by the laser thermometer), and naturally the unit does not react to the key with the key, just as the indicator LED does not indicate that the unit is connected , well, in short, a 100% corpse.
Since the processor is encrypted, and the machine is far away, and you can not dump the dump, so first I try to get by with small blood and reanimate the board, namely, to change the often failing, the aforementioned, microcircuit.

She did not give a substitute for the results. The same heat. Which means only one thing – the end card, and then we have two ways – either to transplant the processor to a live board, or to read the dump and fill it into the normal and secure EWS3 block with the 0D46J processor mask, which I did.


Read data with Xprog v5.55 box programmer

All successfully read

General view of the scope of work

On the BMW EWS3 EWS4 test platform, the unit was seen, the key was identified, the relay worked.
Today I was informed that after the EWS-DME synchronization the car successfully left the service station on its own.
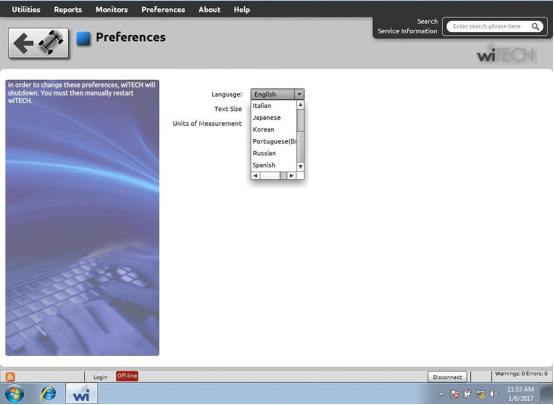
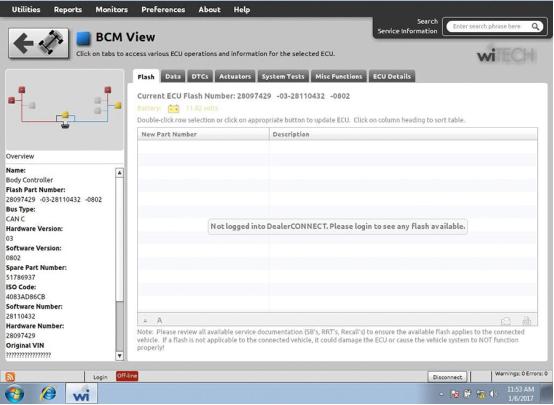
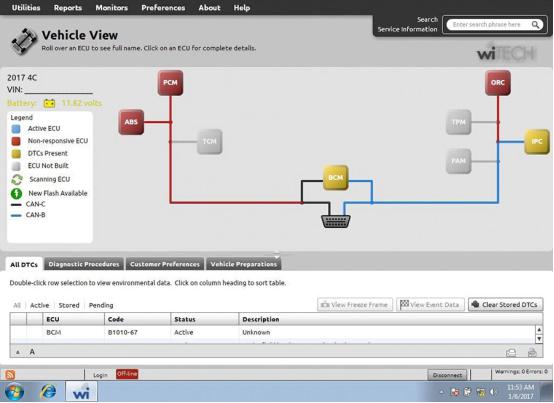
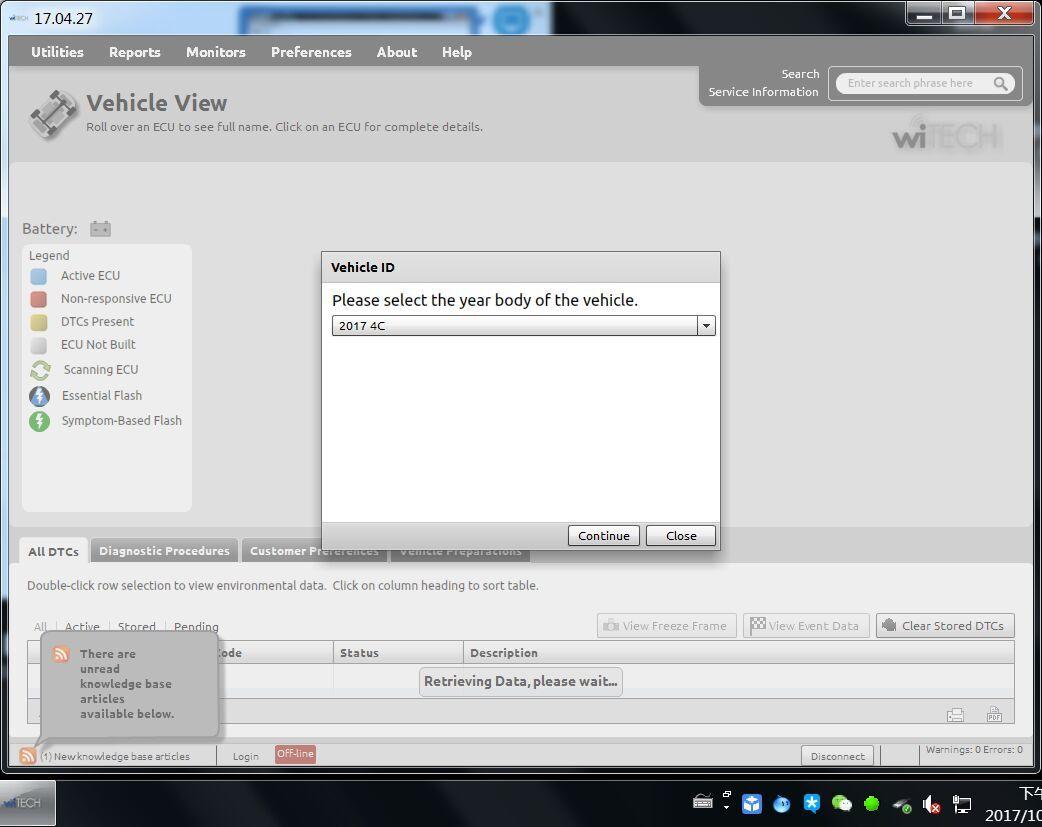
How to use wiTECH 2 v17.04.27 for online programming?


Carprog 8.21 Clone “CRC32 Check Failed" Problem Solution
Here’s the working solution to Carprog V8.21 full clone online version “CRC32 Check Failed” when activate software.
error screenshot:
 Solution:
Download and replace “carprog.vws” file on carprog software.
(Extract the zip file first after downloading)
What's new in Kess V2 V5.028 Ksuite V2.34
KESS v2 Master software V2.34 with firmware V5.028 has been released to the aftermarket.
The actual version is May, 2017.
In comparison with version kess v2 5.017, 53 new protocols have been added, 258 protocols have been updated and corrected.
Added work with Simos18 blocks released after summer 2015goda.
Added work with Toyota on the protocol K-Line.
There was an opportunity to work with cars LandRover / Jaguar, including the last years of release, through the OBD connector.
Including work with the blocks is added:
Ford EDC17CP05, EDC17C70, EMS24xx, SID902
GM / OPEL DELCO E38, E98
PSA BOSCH ME7.4.7, DELPHI DCM6.2
SSANGYONG DELPHI DCM6.2
VAG EDC17CP24, DELPHI DCM3.7
and others.
KESS V2 5.017 vs. kess 5.028 ecu list:
https://zh.scribd.com/document/369694909/Kess-v2-5-017-and-5-028-ecu-list
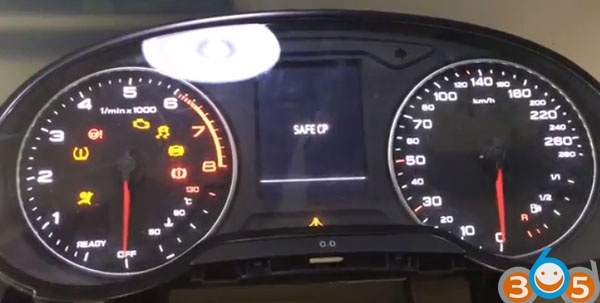
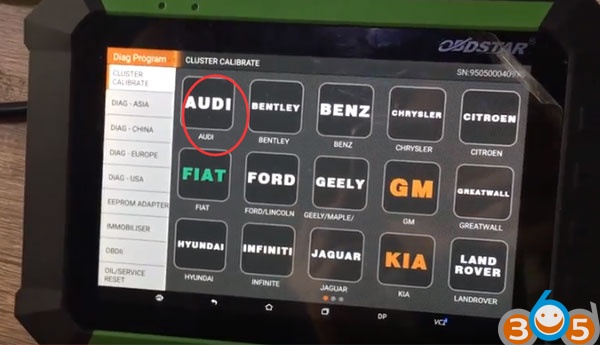
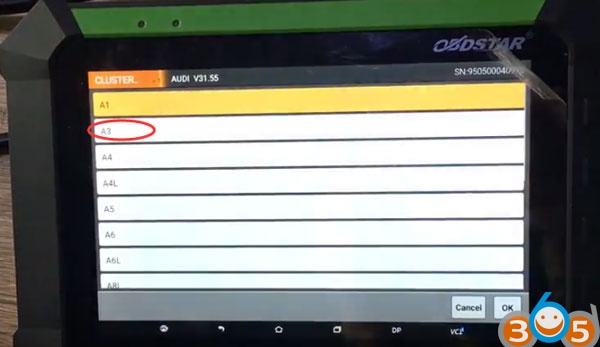
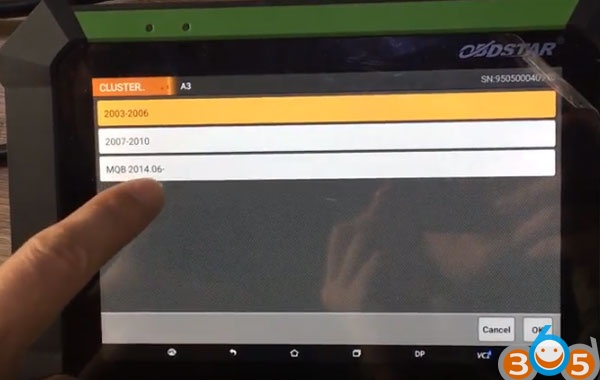
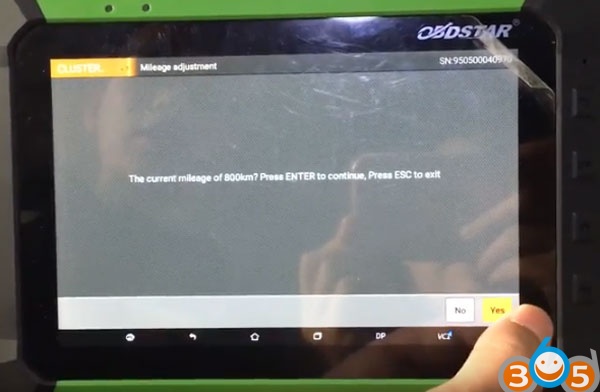
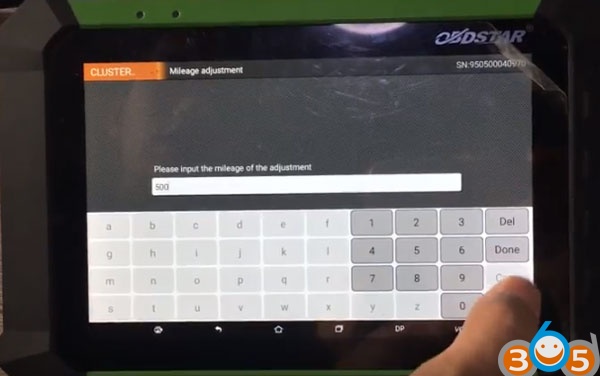
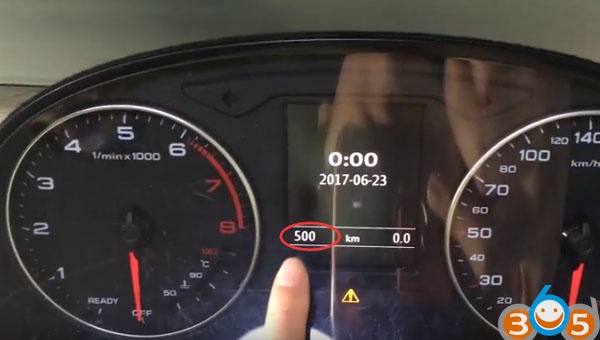
How to change Audi A3 2016 MQB Mileage by ODBSTAR Key Master DP


How to install Elsawin 6.0 and uninstall KB4056892 in Windows
Elsawin 6.0 Windows 10 install:
First, Elsawin 6.0 Initialize failed: Error – 2147024891
Case: I have removed my old Elsawin files from my computer and installed Elswin 6. When opening Elsawin admin there’s a message which says: Initialize failed: Error – 2147024891.
So without a username and password I cannot access anything! Any help please. I run on the recent Windows 10.
Running Elsawin 5.3 can no longer use it since the last Win 10 update. Same error when running the administration app.
Solution: The problem is in security update KB4056892. If you’ll uninstall it, Elsa begins to work. But it is temporary solution. After couple of reboots it’s installs again. As for now the only way is to remove update and turn off all automatical updates. So the problem is not in EsaWin, but in Windows10. PS: use Windows 7 (until 2019)
Steps to uninstall KB4056892 in Windows 10
Click Start and type “cmd”
Right-click Command Prompt and choose Run as administrator
Type “wusa /uninstall /kb:4056892” and press enter
Answer Yes to uninstall & restart when prompted
Reference: Windows 10 KB4056892
January 3, 2018—KB4056892 (OS Build 16299.192)
https://support.microsoft.com/en-us/help/4056892
Second, How to install Elsawin 6.0 on Windows 10 the last update
Elsawin 6.0 was installed
Did windows 10 upgrade
– now Elsa is not registered
Open Esawin admin (Run as admin)
Use default uername and password (admin/admin)
Then top left option (mines in German so Dienste)
Then Code
Then Codeabfrage
This brings up the activation window
Copy the temp code
Using the activation tool again (Run as admin)
Copy code and generate activation code
Paste in Elsawin admin
(mine took 3 attempts at this but now it working)
First 2 codes came up not registered still
Give it a try

Third, Elsawin download and install on Win 10/8/7/XP
Elsawin 6.0/5.3/5.2/4.0 download:
http://blog.obdii365.com/2017/09/03/elsawin-6-0-download-on-windows-10/
Note that Elsawin 5.2 and Elsa 4.0 – tested by professionals and working perfect
Elsa 6.0 and Elsa 5.3 – NOT tested and used on your own risk
