

/image%2F1896381%2F20151209%2Fob_cb2b49_obd365-com.png)


- Rheingold ISTA + Standalone: v4.09.13
- SQLiteDBs: v4.09.12
Articles récents
What to do with a GM TECH2 on Chevrolet C5?
This is a write-up for those with a GM Tech 2 scan tool on Chevrolet C5
Tech 2 scanner is a diagnostic tool for the most part. It can be used to program out/in certain RPO’s in the BCM and can be used to bleed the ABS brake system without introducing air into the system. The extent to which it can be used to tune a Chevrolet C5 is that if you have a PCM Image that will work for your car you can save the current PCM Image and flash the new one you have onto the PCM. It cannot go in and individually change the tuning tables in the PCM as can say either EFI Live or HP Tuners tuning tools. But then those tools cannot touch the BCM either.
If you do or plan to do a lot of diagnostic work on your car it can be a worthwhile tool. Most of the diagnostic charts in the factory service manual assume the availability of a Tech 2. But you have to learn to use the tool like any other computerized diagnostic tool. It has layers and layers of menus to wade through. But in certain diagnostic situations it can be an invaluable tool because it allows you to turn on and off hundreds of computerized settings to aid in the diagnosis process.
GM intentionally dumbed down the capabilities of the Tech 2 to change things to avoid law suits due to an errant technician that changed engine or emissions settings that could result in engine damage or emissions violations.
GM Tech2, the bi-directional scan tool can access all the 10 computers in the c5 corvette. That means it can scan for DTC codes, allow the adding or removing of most accessory codes like turning off the mag ride shocks to install regular schocks, fixing window regulator problems, etc. For Bi-directional it can active the ABS system to flush the brake fluid, reset the Long Term Fuel Trims, eliminate the 1-4 shift on manual trans, etc. It cannot make changes (like a tune tool) to the transmission or engine management system. For the avid DIY’er it is a great tool.
In the C5, the “computers” (technically they are modules) and they communicate over the OBDII compatible DLC data bus to each other. The range from you radio to your ride control, to your HVAC system. Even the Bose head unit talks to the PCM and BCM through this bus, but the CD changer talks over a “private” data bus to the head unit.
In the C5, the “computers” (technically they are modules) and they communicate over the OBDII compatible DLC data bus to each other. The range from you radio to your ride control, to your HVAC system. Even the Bose head unit talks to the PCM and BCM through this bus, but the CD changer talks over a “private” data bus to the head unit.
The Sensor Modules that can be pulled up from the DIC are:
PCM, BCM, TCS, RTD, IPC, HVAC, LDCM, RDCM, SCM, RFA, and SDM.
Only those C5’s with RPO F45 or F55 will have RTD.
PCM, BCM, TCS, RTD, IPC, HVAC, LDCM, RDCM, SCM, RFA, and SDM.
Only those C5’s with RPO F45 or F55 will have RTD.
Reference: Here is a very useful TECH2 pathing document that you can use to figure out how to get to the end result that you need to test.
download link: https://www.corvetteforum.com/forums/attachments/c5-tech/48078347d1490892183-what-can-i-do-with-a-tech2-tech-2paths-en-1-.pdf
Publicité
How to read Hyundai Kia ECU SIM2K-341 MPC562?
What tool and how to read Hyundai/Kia ECU SIM2K-341?


Answer:
Xhorse VVDI Prog programmer can read and write Tricore 1766 on the ECU SIM2K-341.
Sharing BDM read for this type ECU’s
MPC562-S29CD016J(IX55-Sonata-Sportage …)
PIN 1=DSDO
PIN 3=PORST/HRESET
PIN 5=DSCK
PIN 6=VF0/VFLS0
PIN 7=DSDI
PIN 10=GND


Those Tricores it can read is only some VW ecu’s because VVDI Prog don’t have security
bypass for other…Auid 3 ecu with tricore TC-1762 it cannot read.
Mercedes W203 mask 4J74Y pinout to Xprog and UPA
This is pinout of EZS 203 545 01 08, using ECU programmers Xprog or UPA USB programmer.
Mercedes W203 mask 4j74y
I usually use rosfar pinouts transfer pindata to Xprog. UPA read only first mcu..for second need security bites
4J74Y W203

W203 1J35D R270 BDM programmer

W203 1J35D (xJ74Y)

EIS W203 1J35D pinout Xprog-M


Yes, you can have luck to read w204 eis with Xprog and erase the flash. But many talk about their failure with W203 mask 4j74y and Xprog, coz there are many versions of Xprog box programmer clone – quality differs and depends. Have a HQ clone then go for 4j74y. therwise, you would have reading error and hear beep beep.
Site of HQ Xprog
So, Xprog is not so good with HC908. Some never got Xprog to work with HC908 in circuit. They tried and had no success to read this mask at with XPROG, usually they went with R270 programmer to read it finally – R270 without a problem (I think the new R290 or R280 should have no issues also. And R290 is better for future use.)
In sum, for 4J74Y W203, the best is ETL/R270 progrmmer, then Xprog m.
http://blog.obdii365.com/2018/01/02/xprog-upa-mercedes-w203-mask-4j74y-pinout/
How to flash Diatronik Diatronik Airbag Tool security key
Diatronik engineers will update/improve their devices recently. And here’s the detail instruction on updating Diatronik SRS+DASH+CALC+EPS OBD Tool security key.

1.After the first run utility screen will appear where you select to Start new dongle remote update session:

2.On the next page displayed is the generated update request (number-question) is a sequence of hexadecimal characters containing information about your key:

The update query can be stored in a file (button [To file]), copied with the button [To clipboard] or sent as email to developer ([mail]).
Archive the text file with results using your GCT serial # as file name and email it to developer. The update program can be closed at this stage. Wait for response email from the developer.
- Data updates are transmitted in encrypted form and can only be used once
- When generating the update data and during firmware update the key performs a series of checks on key options (ID, Shared code, and some others). This excludes the possibility of substitution of the key.
You must then run the client update utility again and select “Resume previously started remote update session”, then click [Next] button.

The screen will display the wizard page that contains the input field and display dump updates. Enter the dump received via email using one of the buttons: [Paste] or [Browse…]:
After inserting the dump and pressing [Next] button the operation for updating the key memory with new data. Then last screen will display the outcome of the operation:
Important!
Next steps are only needed when the update key is in fact the firmware or image template. If the update was performed based on data of the image file, then step 3 is the final stage of the upgrade.
In the process of updating the key memory client utility will generate the final code-confirmation containing information about the updates (successful/unsuccessful). Code-confirmation is to be saved (button [To file]) or copied [To clipboard], renamed using your serial # as file name and sent to developer of the application by any convenient way (email, PM, Skype:moe03071etc).
Here is a video operation in Russian
If you cannot understand Russian, please contact engineer via Skype above.
Instructions for configuring and remotely flashing the Diatronik Guardant security key.
http://blog.obdii365.com/2017/12/27/update-diatronik-srs-dash-tool-software/
Publicité
6WA retrofit KOMBI BMW F10 535i 2011 with E-sys
How to retrofit KOMBI BMW F10 with 6WA "Black Panel" meter (go from the basic Instrument Cluster to 6WA)?
Model example: BMW F10 USA 535i 2011
(Credit to GermancaraTVO. You are at your risk)
Tools used:
Xprog m box ecu programmer
BMW ENET cable and E-sys coding software
From beginning to end - reset (mileage, VIN) => coding. Quickly and specifically according to the case. Finally - a happy owner! 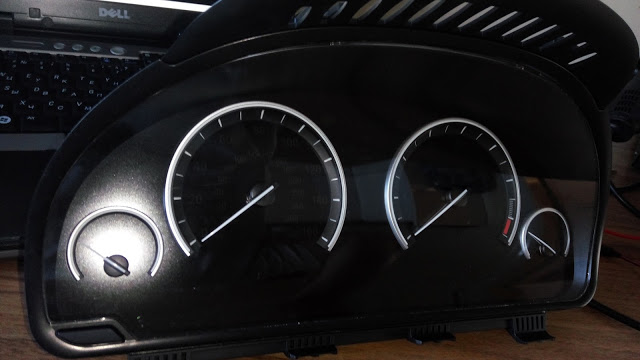
The real mileage before zeroing - 75103 km (according to VIN the meter lived earlier)
Next, disassemble the meter to get the proper access to the elements with which I will work


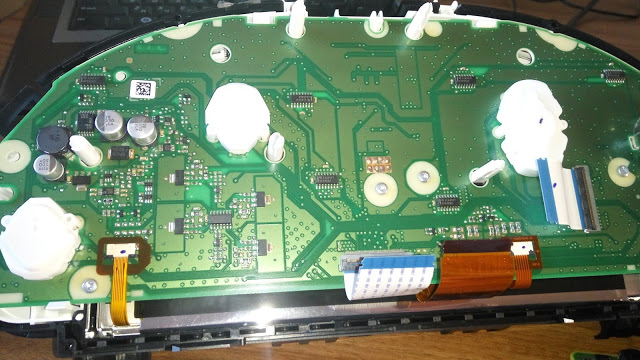
Next comes the Xprog-m programmer, by means of which I gain access to the meter's memory and do zeroing. 
Now with us on the table a ready to program / coding counter in the car with E-sys
Actually, the issue of coding for a specific car


And the end result without any kind of errors 
Success.
Mercedes E210 Key MCU MC68HC05E6 Pinout to Carprog
I need help to read a old key from MB E210 with MCU MC68HC05E6(0F82B) try out of circuit but without success, by UPA adapter 15 and xprog adapter by pinout. Someone here can help me with correctly pinout in circuit or out circuit, i have carprog, xprog, UPA, please!!!

Solution:
connect to a CarProg programmer
For HC05 programming use A10 cable 7 color wires:
YELOW – RX communication signal from MPU;
GREEN – TX communication signal to MPU;
BLUE – Reset signal to MPU;
ORANGE – MODB signal to MPU, low level;
BROWN – GND (ground);
RED – switched +5V;
VIOLET – switched +12V;


How to Activate Internet on BMW F10 iDrive with E-sys software
On the BMW F10, it is possible to code Internet / BMW Live with 6VC Combox and 609 Nav by disabling BMW Assist and using a fake VIN with factory 614 Internet written to Combox, and then updating BMW Services.
I detailed that process here:
Change your VO as follows:
– 612 (or 633 or 639 if present)
+ 644
+ 614 (Required but already present)
+ 615
+ 6AL
+ 6AB
VO CODE HU_CIC
VO CODE CMB_MEDIA
FDL CODE CMB_MEDIA:
– TELEMATIK_VIN = Coding_VIN
FDL CODE CMB_MEDIA:
Use modified VO with VIN that has factory options 614 and 615 as explained below:
it is very simple to write a VIN to the Combox in E-Sys coding software
Spend time in Tool32, CMEDIA.prg and E-Sys trying to figure it out.
First you must code CMB_MEDIA / TELEMATIK_VIN = Coding VIN using your real FA VIN. Then, open your FA up in the FA-Editor, change the VIN, Caluclate FP just to make sure there are no problems with it, and then save the FA with a new name, i.e. FA_VIN_FAKE. Lastly, go to the coding module, and under Vehicle Order load your new FA_VIN_FAKE, activate FA, and then FDL code CMB_MEDIA. Lastly, read CMB_MEDIA coding data, and verify the new VIN in brackets. In the attached picture, you can see my Combox and Head Unit are showing two different VIN’s.
Afterwards, either shut down E-Sys, or load your original FA back and activate it before coding anything else. DO NOT code anything else with this FA, and DO NOT write this FA to the car.
For Internet and BMW Live to work, you need a VIN with factory options 614 and 615.
*** Use only to FDL Code CMB_MEDIA; DO NOT write this FA to the Car
1) Enable Data Transfer Option Under Phone
2) Enable Bluetooth Data Tethering on Phone
3) Under Connected drive; Update services (should show BMW Live and Internet services)
4) Go to BMW Live and Internet and make sure it it working
After it is working:
Use original VO with car VIN:
FDL CODE CMB_MEDIA:
– TELEMATIK_VIN = MOST_VIN
Read CMB_MEDIA and verify Short VIN in brackets [xxxxxxx] is car VIN.
DO NOT update services again or you will loose BMW Live and Internet.
*** If you do not return the Combox VIN to car VIN, you will encounter problems with future dealer programming, as the Combox will not be recognized, and programming will hault.
All done with a BMW ENET cable with Esys. $11 did all.
http://blog.obdii365.com/2017/12/24/bmw-e-sys-enet-enables-internet-on-f10-idrive/
How to use Insite 8.2.0 with Inline 5 Data Link on Windows 7
Here’s the instruction on adding Cummins Inline 5 data link truck diagnostic adapter to INSITE 8.2.0 software.
Preparation:
First you need to close all anti-virus software program
Then install Cummins 8.2.0 pro/lite version software
How to Install Activate Cummins Insite 8.2.0.184 Pro and Lite
Step 1: Install Inline 5 driver
Check your operating system, here we set it up on Windows 7 32-bit

Open software CD
Open INSITE.7_6_2.rar-> Software folder->INSITE 5 Drivers


Copy Inline 5.7.0.1 Setup- 32 Bit.exe to desktop
If you use 64-bit system, you copy Inline 5.7.0.1 Setup- 64 Bit.exe to desktop

Install the adapter driver, here we use Cummins Inline5 data link (you can use Inline 6, nexiq or other adapters as well)
Run Inline 5.7.0.1 Setup-32 Bit on desktop as administrator
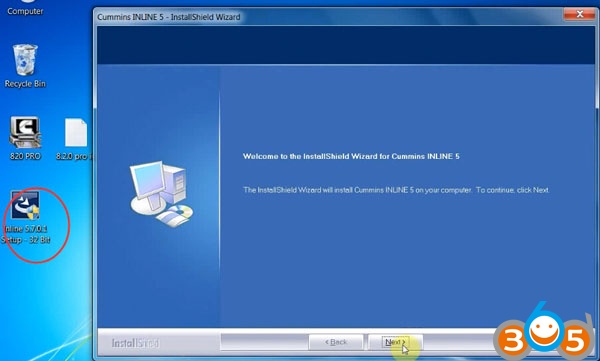
Click on NEXT
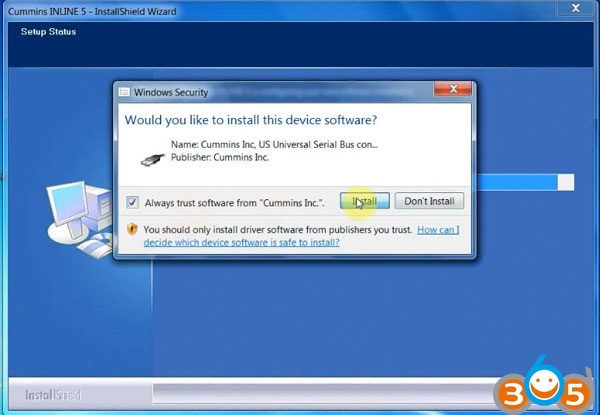
Accept the windows security warning to install driver software
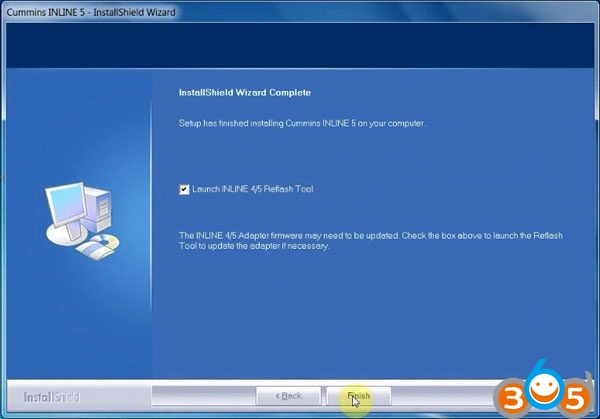
Tick “Launch Inline 4/5 Reflash Tool” and click on Finish
Delete Inline 5.7.0.1 Setup-32 Bit on desktop
Device driver has been successfully installed


Open Computer->Manager->Device Manager->Universal Serial Bus Controller to check device is well connected

Step 2: Add Inline5 adapter to INSITE 8.2.0
Open INSITE 8.2.0.184 pro or lite version software on desktop

Select Add New option on the middle of the bottom tool bar

Click Next to install ECU Connection Wizard

Select RP1210 adapters, click on Next

Select Vendor, Adapter INLINR 5 USB and protocol Auto detect, click on Next

Click on Next

Tick both 2 options and click Finish
Again software will prompt to install ECU connection wizard, click next
Do the same setting as above, but this time we choose protocol J1708
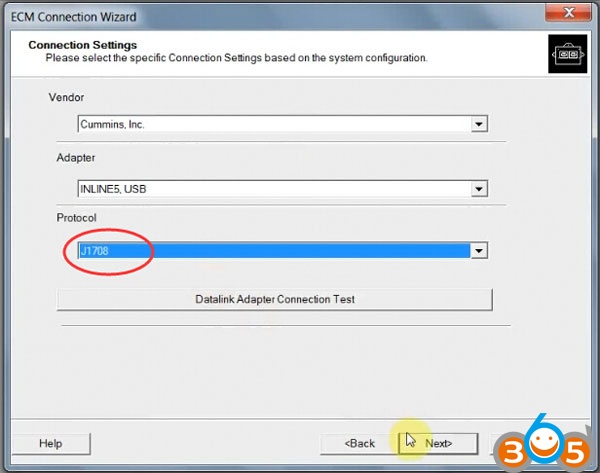
Click Finish
Do the setting again, this time we add protocol J1939

Click Finish and cancel ECU connection wizard interface

Please add the corresponding adapter in the iniste software

Select INLINES USB (Auto Detect) Connection on the middle of bottom tool bar

Click Connect button to connect to ECM
Now you can using the software, read fault code, manage data logger, do calibration etc


http://blog.obdii365.com/2017/12/21/use-cummins-insite-8-2-0-184-with-inline5-data-link/
Publicité
How to Read Renault Grand Senic Pin Code by ODBSTAR X300 DP
We’ve managed to use Obdstar x300 dp key master to read pin code from Renault Grand Senic 5 key card successfully. Easy steps below:
Connect X300 DP host with vehicle via diagnostic socket
Turn ignition on
Select Diag Program->Renault->Renault V30.11 -> PinCode Read->Type 2


Remove the smart card, turn ignition off, press the Start button.
Press ENTER to continue

Reading pin code

OBDSTAR X300 DP read Renault Grand Senic from key card success.

http://www.key-programmer.org/2017/12/21/obdstar-x300-dp-read-renault-grand-senic-pin-code/
Carprog Read Citroen Berlingo 2004 BSI 95160 Eeprom
Questions before entering:
I want to modify the mileage of an citroen berlingo 2009. I don’t know what tool i need to purchase and i have no clear instructions found for this car.
Can you guys help me with that?
The information that i already know is that reprogramming is needed in the bsi by Nec and an second time in the odometer by the eeprom if i’m correct?
Solution:
With UPA USB you can do the work. It’s cheap and good.
Berlingo 2009 has EEPROM at BSI and TACHO.
dash 95020
bsi 95128 or 95160
read with upa usb 95128 from BSI. If your upa does not have 95128 option, try to read as 25C128.
95128=25C128
Read 95128 content and write only part where mileage is stored. Quicker and safer.
Any programmer who supports the 25XX or 95XX family, does. Such as Carprog, TL866CS.
Attention to the reading and writing of the eeprom, if the programmer does not read or write well, the car no more starts.
Here’s an example on Citroen Berlingo 2001-2004 BSI odometer correction by caprog 8.21 online version.
read/write eeprom 95160 (change mileage) berlingo bsi 2004 with carprog


Read KM
Original mileage: 148324KM


Enter odometer you desire to change, click on Write KM

Change mileage success.

Related post:
How to Program Ford Transit All Keys Lost with OBDSTAR F100
OBDSTAR F100 Ford/Mazda OBD key programmer Ford Transit key programming with ALL KEYS LOST BYPASS guide.
Connect F100 host with vehicle via OBD socket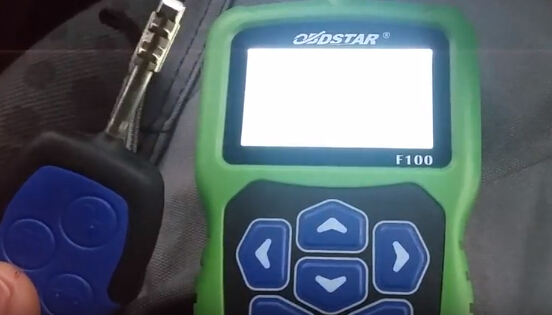
Select Function->Immobilizer->Ford/Lincoln->Ford->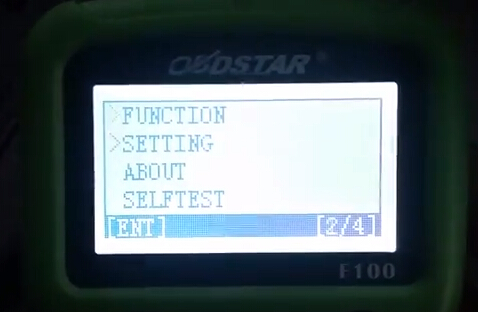
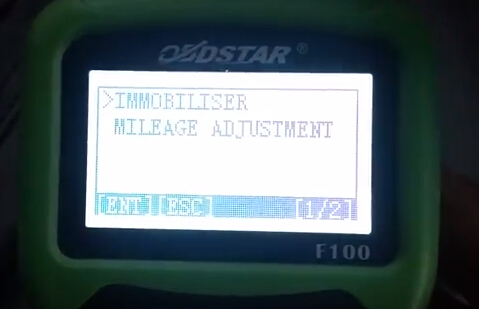
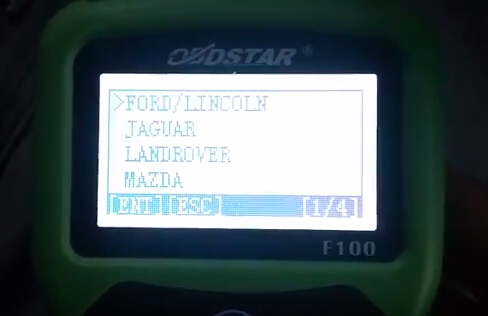
Turn ignition on
Immo indicator flashes 
Select Ford->Immobilizer->Select Region-> Transit-> Program Keys

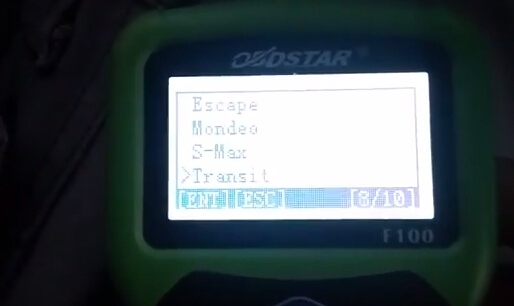
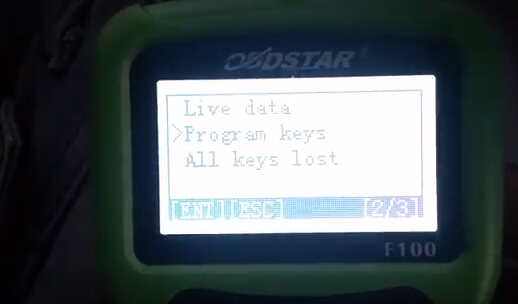
Turn on ignition
This progress does not erase key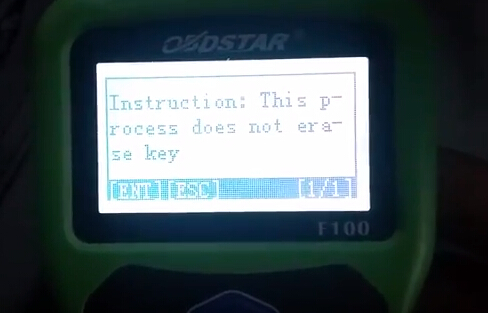
Communicating...
Program key success.
Test the new key.
How to use Digiprog 3 for Audi A8 (2003-) odometer correction?
Digiprog 3 v4.94 odometer correction tool how to use for Audi A8 (2003-). Here are notes for you all, of Tacho meter value
Audi A8 (2003-)

Diagnostic connection is located in the cabin

Connect Diagnosis Port with DP3 cable of Plug 16

Ignition on
Connect the DigiProg 3 main unit to Plug 16
The DigiProg needs no separate electricity supply; it is supplied via the diagnosis port
Follow DigiProg3 v4.94 instruction and change KM

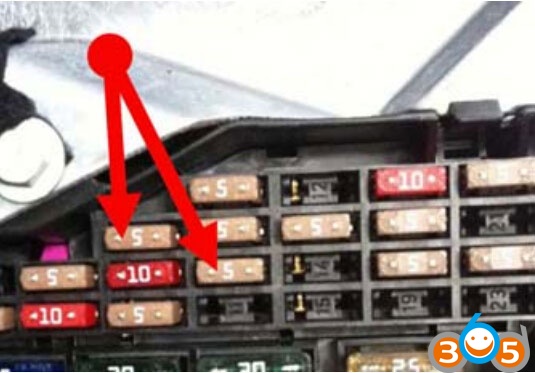
Enter KM value and confirm Entry
Audi A8 mileage correction completed!
Before:

After:

Job’s done!
Note: If error message “Access denied” pops up, pls. choose:
PKW/LKW-Audi-A8-2003-(4E) 1. Flash Cxxx/
Dxxx
Confirm with Hook
Remove fuse 5 + 10
Wait approx. 5 seconds
Reinstall fuse
if tacho meter is dark
Switch Ignition on and off
Choose program:
PKW/LKW– Audi—A8-2003-(4E) Diag
Enter KM value and confirm Entry.
Publicité
Xentry Connect C5 Do not remove hard drive in host
Each Mb star diagnosis DoIP Xentry Connect C5 host comes with a built-in hard drive (green board in picture below) which contains the data that makes the machine run properly. The hard drive is used to reflash/update C5 firmware as well.

Recently come customers are attempt to remove hard drive on Xentry Connect C5 host by themselves and change data on computer, we sincerely warn our customers don’t do that.
Please don’t move the hard drive on SD Connect C5 host. Don’t connect the hard drive to computer to change data. You are at your risk. We are not hold the responsibility of your damage.
You need to send back the hard drive to factory to run firmware upgrade. If the factory provides the firmware upgrade link or online resources, you don’t need to send it back.
By the way, the movable external hard drive (software HDD) in the package contains Xentry Openshell XDOS, and engineering software Vediamo, DTS Monaco etc, it is the correct hard drive you can run on computer.

And don’t insert the software HDD to C5 host to replace original hard drive. It will cause damage to the xentry connect c5 multiplexer.
http://blog.obdii365.com/2017/12/15/doip-xentry-connect-c5-host-hard-drive-and-software-hdd-issue/
How to Register JMD Handy Baby with VAG 48 96 bit Copy Function?
JMD Handy baby key copy machine latest software released to V8.8.9. With the latest software, you can copy VAG ID48 96 bit chip online.
Chinese version 8.8.9 is already available, English version Handy baby software will be available on Dec, 15th/16th, 2017.

JMD Handy Baby 96 bit 48 online copy!
Each time decoding need token!
How to register and open Handy baby id48 96-bit online copy authorization?


If you have JMD assistant adapter, register 48 96-bit copy is free.
If you don’t have JMD assistant adapter, you need to pay extra money to register.
For the register and decoding token price, you can contact obdii365.com customer service.
Email: Sales@OBDII365.com
Skype: OBDII365.com
How to use Handy baby to Copy ID48 96 bit chip online?
Demo video
Picture Guides:


http://blog.obdii365.com/2017/12/14/jmd-handy-baby-copy-vag-id48-96-bit-chip/
Rheingold ISTA + 4.09.13 Standalone Free on Mega
The BMW ICOM ISTA standalone version is a version that disables some hardware checks and server checks that are unnecessary for individual users.
As you know, ISTA-D can receive the data related to the vehicle maintenance from the BMW server. If you are a general individual user, you can not access the BMW network anyway.
The installation process is similar to the basic ISTA-D installation process, and the required files are almost all contained within the archive. There is only an RCleaner that initializes the registry, which is included in the ISTA-D download link, so download it if you need it.
version
