

/image%2F1896381%2F20151209%2Fob_cb2b49_obd365-com.png)
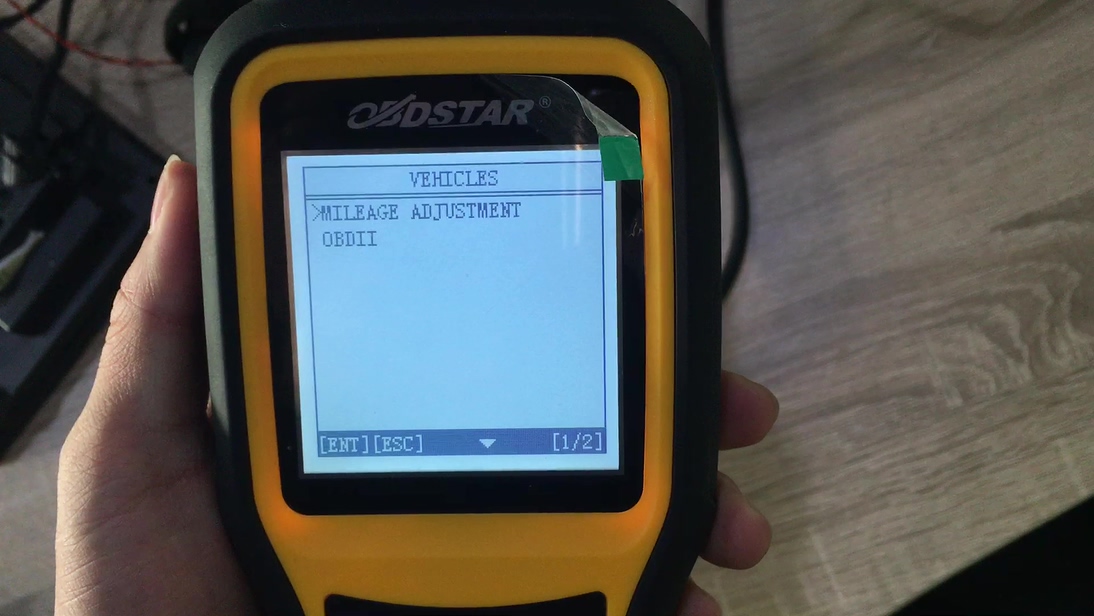
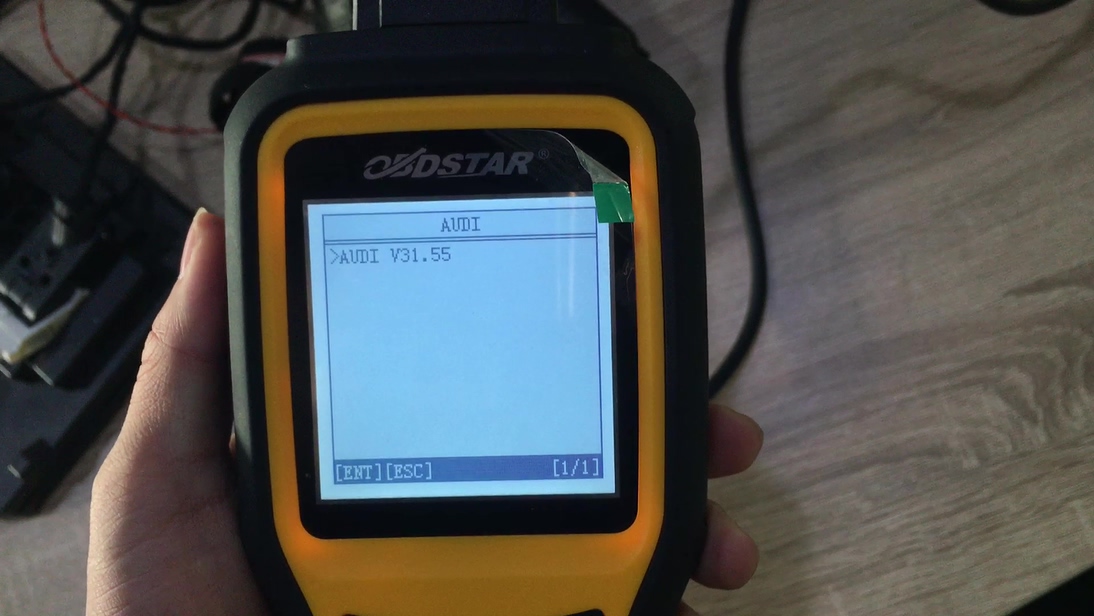
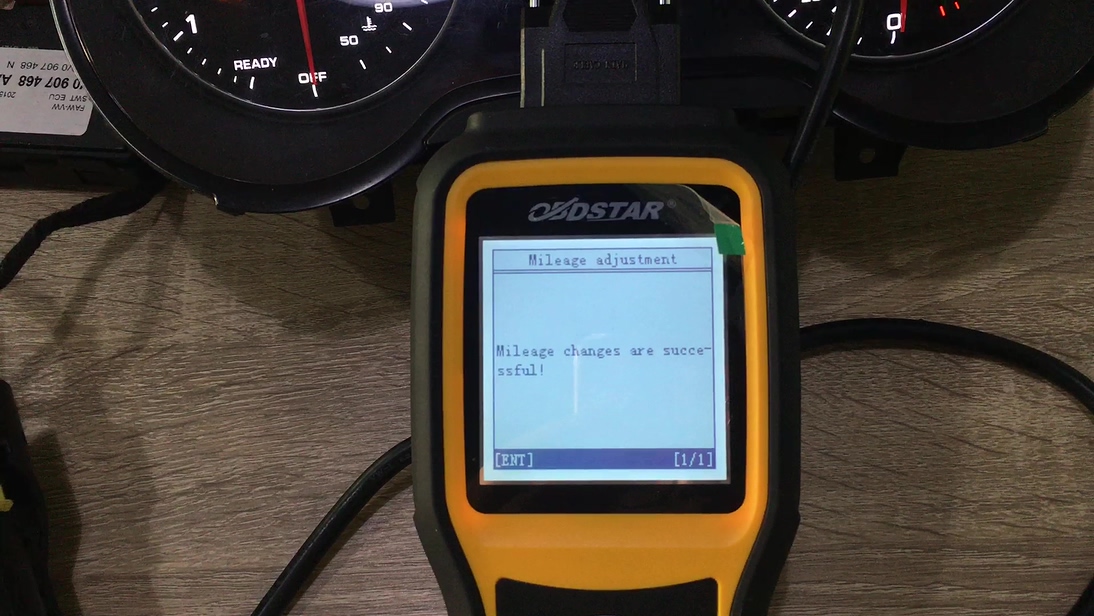
How to use OBDSTAR X300M to change Audi A3 MQB mileage


Vpecker Easydiag E1 Code Scanner Vehicle List
VPECKER Easydiag WiFi/Bluetooth Wireless OBDII OBD2 Full Diagnostic Tool car list:
| Region | Brand | Year | Region | Brand | Year |
| Japanese | TOYOTA | 2017 | Europe | VW | 2017 |
| LEXUS | 2017 | AUDI | 2017 | ||
| DAIHATUS | 2012 | SEAT | 2017 | ||
| HONDA | 2017 | SKODA | 2017 | ||
| ACURA | 2017 | BENTLEY | 2013 | ||
| NISSAN | 2017 | LAMBORGHINI | 2014 | ||
| INFINITI | 2017 | BENZ | 2017 | ||
| MITSUBISHI | 2013 | SMART | 2013 | ||
| SUBARU | 2013 | BMW | 2016 | ||
| ISUZU | 2010 | MINI | 2016 | ||
| SUZUKI | 2013 | ROLLSROYCE | 2016 | ||
| MAZDA | 2013 | PORSCHE | 2016 | ||
| FUSO | 2015 | FORD(EUROPE) | 2017 | ||
| Korea | HYUNDAI | 2017 | JAGUAR | 2016 | |
| KIA | 2017 | LANDROVER | 2015 | ||
| DAEWOO | 2011 | PEUGEOT | 2013 | ||
| SSANGYONG | 2013 | CITROEN | 2013 | ||
| India | MARUTI | 2015 | FIAT | 2012 | |
| MAHINDRA | 2017 | LANCIA | 2011 | ||
| TATA | 2015 | DACIA | 2014 | ||
| Malaysia | PERODUA | 2016 | ALFA ROMEO | 2011 | |
| PROTON | 2016 | MASERTI | 2014 | ||
| Australia | FORD(AUSTRALIA) | 2017 | OPEL | 2011 | |
| HOLDEN | 2012 | VAUXHALL | 2011 | ||
| America | GM | 2012 | RENAULT | 2013 | |
| CHRYSLER | 2017 | SAAB | 2010 | ||
| FORD(AMERICA) | 2017 | VOLVO | 2012 | ||
| JEEP | 2017 | ABARTH | 2014 | ||
| SCION | 2017 | ASTON MARTIN | 2014 | ||
| OBDII | 2017 | BUGATTI | 2014 | ||
| FERRARI | 2014 |
| Region | Brand | Year |
| China | BYD | 2017 |
| CHANGAN | 2017 | |
| CHANGHE | 2016 | |
| CHERY | 2014 | |
| EMGRAND | 2017 | |
| ENGLON | 2017 | |
| FOTON | 2017 | |
| GEELY | 2014 | |
| GLEAGLE | 2017 | |
| GWM | 2017 | |
| HBSH | 2012 | |
| HUACHEN | 2017 | |
| LIFAN | 2013 | |
| WULING | 2017 | |
| YUAN | 2014 |
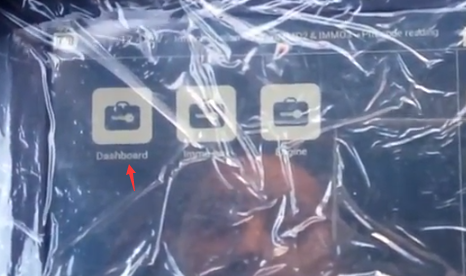
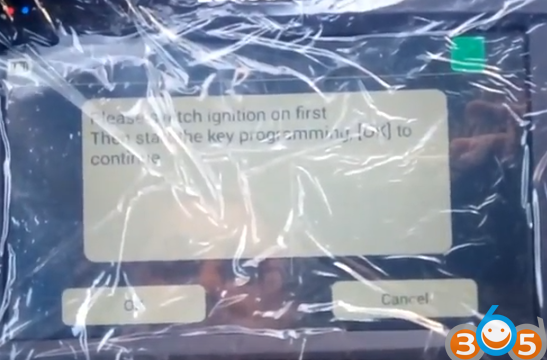
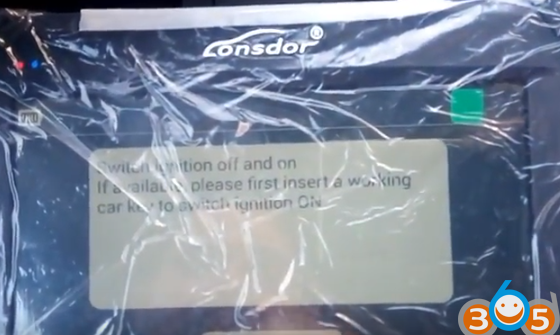
How to Program VW Golf 4 Remote Key with Lonsdor K518ISE


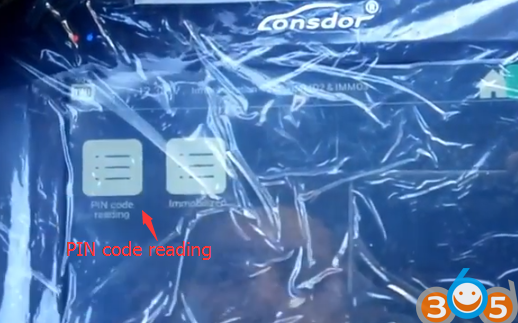


http://lonsdor-k518ise.blogspot.com/2018/01/lonsdor-k518ise-read-vw-golf-4-pin-code.html
How to change GM MDI serial number
Figured it out. To get shell on the GM MDI clone interface and change the serial numbersee the instructions:
Mount the sdcard parition 1 under linux, and rename telnetd.sh-disabled to telnet.sh in /bin. While there I also edited the init script and added this near the start to make the prompt nicer:
Quote:export PS1='[\u@mdi \W]\$ ‘
Access u-boot (38400 baud, see previous post), and at the prompt type:
Quote:askenv setbootargsprimary
Please enter ‘setbootargsprimary’:run normalargs addinit addconsole addeth addprimary;setenv bootargs ${bootargs} mtdparts=flash0:256k(boot),128k(bootvars),1536k(linux1),6144k(initrd1),1536k(linux2),6144k(initrd2),128k(linuxvars1),128k(linuxvars2),32k@16320k(serialnum),32k(macaddress),128k@16256k(id);
Boot
The MDI will boot and start a telnet server on its IP and have a new flash partition configured as /dev/mtd10 called ‘id’. This will align with the erase block so can be updated. Check in /var/log/messages for the presence of ‘id’ without it being forced readonly.
Telnet in and rip a copy of mtd10 with dd, and send it to an ftp server you have setup on your lan.
Quote: [root@mdi ~]# cd /tmp
[root@mdi tmp]# dd if=/dev/mtd10 of=mtd10.img
256+0 records in
256+0 records out
[root@mdi tmp]# ls -l mtd10.img
-rw-r–r– 1 root root 131072 Jan 1 00:07 mtd10.img
[root@mdi tmp]# ftpput -u <user> -p <pass> <ip> mtd10.img mtd10.img
Now load up mtd10.img on your pc in HxD or Hexworkshop. The serial is at 0x10000 with a crc32 checksum of 0x10000->0x17FFB at 17FFC (LSB).
MAC is at 18000 with a crc32 checksum 0x18000->0x1FFFB at 1FFFC.
Update both (just change the last couple of numbers), and use the calculate checksum feature of the hexeditor to calculate crc32 the sums of of the ranges and save the new sums in the bin (remember to enter them in LSB format).
Now pull the files back to the mdi, and update flash:
Quote:[root@mdi ~]# cd /tmp
[root@mdi tmp]# ftpget -u <user> -p <pass> <ip> mtd10-new.img mtd10-new.img
[root@mdi tmp]# cd /usr/local/mtd/
[root@mdi mtd]# ./flash_unlock /dev/mtd10
[root@mdi mtd]# ./flash_erase /dev/mtd10
Erase Total 1 Units
Performing Flash Erase of length 131072 at offset 0x0 done
[root@mdi mtd]# ./flashcp /tmp/mtd10-new.img /dev/mtd10
[root@mdi mtd]# dd if=/dev/mtd10 of=/tmp/mtd10-readback.img
256+0 records in
256+0 records out
[root@mdi mtd]# md5sum /tmp/mtd10-new.img /tmp/mtd10-readback.img
1a1f4fb7db878218c558b45c0db50c9f /tmp/mtd10-new.img
1a1f4fb7db878218c558b45c0db50c9f /tmp/mtd10-readback.img
Now reboot the GM MDI multiple interface, and hold down the power button so it goes in to recovery mode. Use MDI manager to recover the device. Once completed it’ll have the new serial and mac.
I expect that the cloners will find this thread and soon they wont all have the same serial anymore. But if you already have one then you can do this yourself, so long as your careful and make sure everything is going to plan and makes sense to you as you go.
BIG THANKS to gmtools from the MH forum
src: https://mhhauto.com…GM-MDI-serial-number
Top 4 Difference Between Mini Pro TL866CS and TL866A Programmer
The difference between Mini Pro TL866CS and TL866A programmer
1. The ICSP interface (6-pin interface) is only supported in the TL866A model.
2. A small part of Microchip MCU with more than 40pins requires the use of TL866A for programming on the ICSP interface. Most of the microchip PICs MCU chips are supported on both the ICSP and the 40pin standard ZIF programmer socket.
3. Microcontrollers ATMEGAxxxx and SYNCMOS in the MCU SM89xxx SM59xxx
TL866A supports serial programming on the ICSP and parallel programming on the ZIF pad of the programmer.
TL886CS only support parallel programming on the ZIF block of the programmer.
4. SPI chips, AT45DBxxxx series can only be programmed using the ICSP interface (TL866A only).
5. For all other chips. TL866A and TL866CS do not differ.
Both programmers work with genuine TL866 adapters for devices up to 48 contacts. (Tsop)

Volvo VIDA 2014D Blank Page Problem Solve by Patch Download


If your computer date/time is newer than 31/12/2018 and you fails to login VIDA All-in-one, please download patch here:

http://vidadice.blogspot.com/2018/01/volvo-vida-dice-2014d-failed-to-login.html
How to solve VAS5054A ODIS 4.2.3 Installation Issues and Errors
Bluetooth and USB connection works fine!
“No valid software configuration could be found at the specified URL. Please select different URL.”
What can i do ?
1. not enough space on hdd
2. did not meet update requirements (prerequisites)
3. corrupted download.
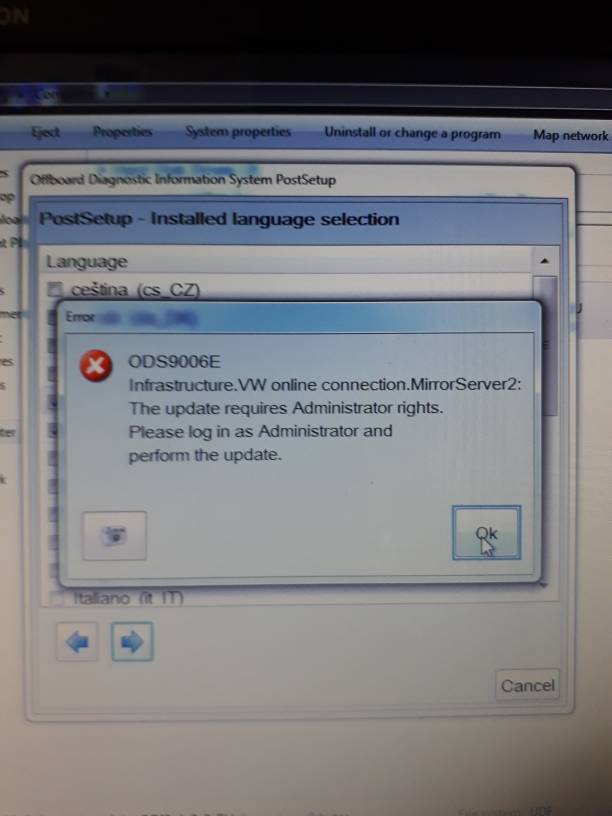

I would use it on Windows 8.1
Can anyone help me?
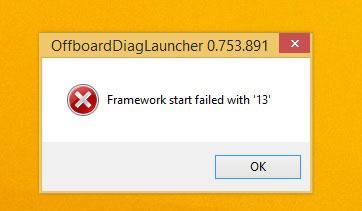
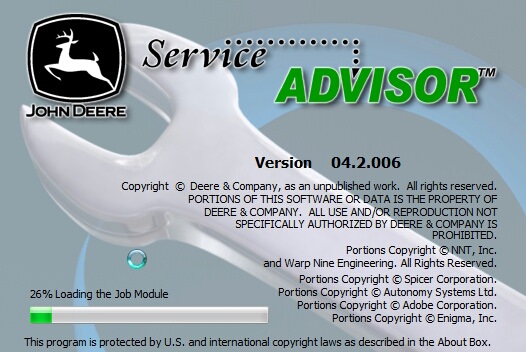
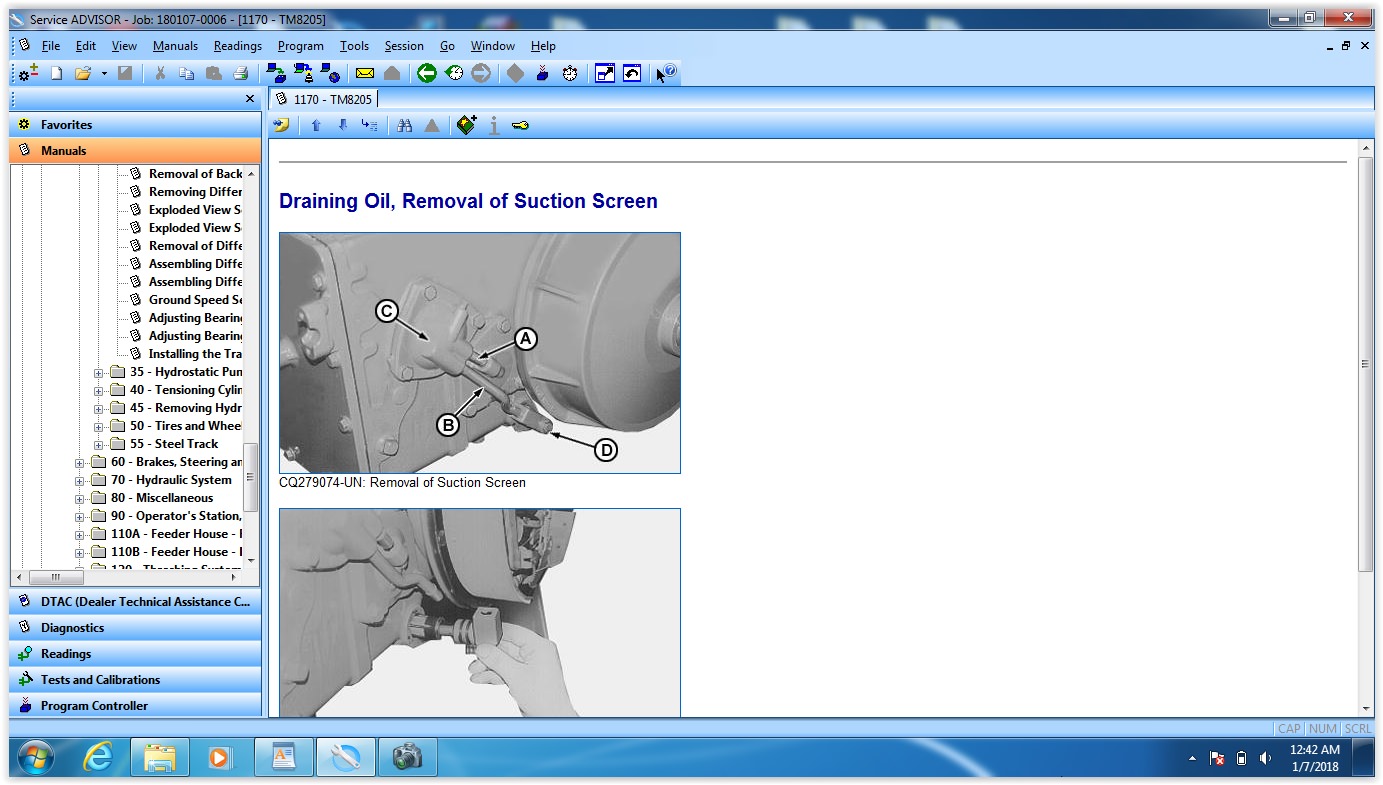
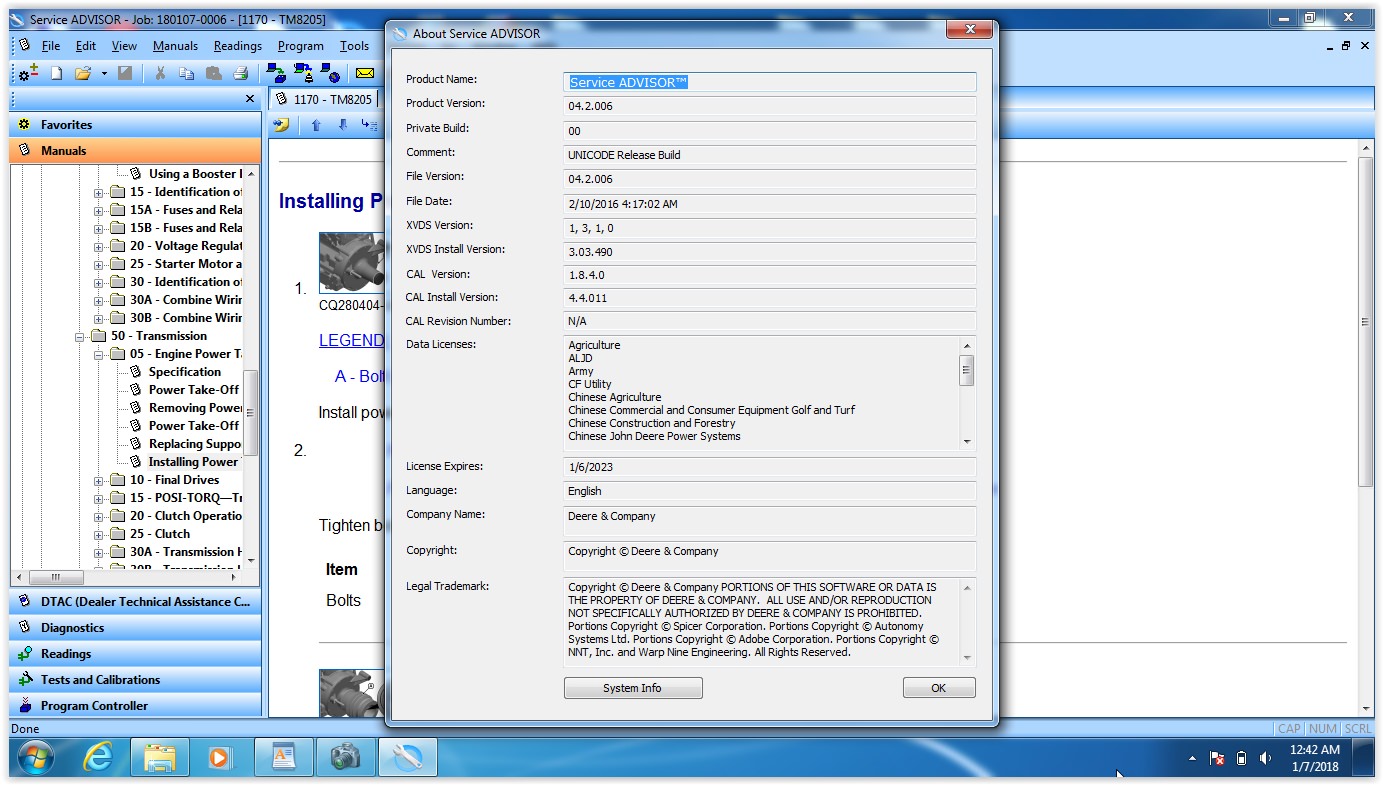
John Deere Service Advisor SA 4.2.006 Free on Mega
John Deere AG Management Solutions, Attachments, Backhoes, Combines and Headers, Cotton Harvestings, Excavators, ForkLifts, Hay and Forages, MAte Hand Cut and Shredderses, Plantings and Seedings, Skid Steers, Sprayers, Sugar Cane Harvesters, Tillages, Tractors, Worksite Pro Attachments.
John Deere Service Advisor 2.8 CF (Construction and Forestry), workshop service manual, repair manual, diagnostic, electrical wiring diagram, hydraulic diagram John Deere.
John Deere Service Advisor 4.0 CCE (Commercial and Consumer Equipment)dealer technical assistance, diagnostics, connection readings, calibrations, interactive tests, specification, tools, assemble and disassemble presented all models John Deere Construction Equipment and some models Hitachi, Euclid, Bell and Timberjack.


Ktag 7.020 clone read BMW X5 EDC17CP45 ECU
Question:
I have a bmw with edc17cp45. Car is x5 4.0 yes I know this is 3.0 diesel engine year is 2013. Some were I read this ecu is password protected. What tool and how to read the data?
Answer:
Has to be drilled , only one hole if you have later k-tag or x17 and kess obd might be a cp56
China ktag clone newer version works on this ecu. ktag 6.070 work with this ecu but via dimsport trasdata. you need connect GPT cable.
Here’s the example on reading ecu edc17c45 from 2013 .done with gtp cable on side an boot pin on under side
china ktag 7.020 not reworked.
works great.
BMW Bosch EDC17CP45 Pinout

First you need to drill a hole. It’s dangerous. Be careful.


Then make the connection


China ktag 7.020 firmware works great.
http://blog.obdii365.com/2017/06/12/read-and-write-bmw-f10-edc17cp45-with-ktag/
GM Tech2 and HP Tuners which is better


What to do with a GM TECH2 on Chevrolet C5?
In the C5, the “computers” (technically they are modules) and they communicate over the OBDII compatible DLC data bus to each other. The range from you radio to your ride control, to your HVAC system. Even the Bose head unit talks to the PCM and BCM through this bus, but the CD changer talks over a “private” data bus to the head unit.
PCM, BCM, TCS, RTD, IPC, HVAC, LDCM, RDCM, SCM, RFA, and SDM.
Only those C5’s with RPO F45 or F55 will have RTD.
How to read Hyundai Kia ECU SIM2K-341 MPC562?
What tool and how to read Hyundai/Kia ECU SIM2K-341?


Answer:
Xhorse VVDI Prog programmer can read and write Tricore 1766 on the ECU SIM2K-341.
Sharing BDM read for this type ECU’s
MPC562-S29CD016J(IX55-Sonata-Sportage …)
PIN 1=DSDO
PIN 3=PORST/HRESET
PIN 5=DSCK
PIN 6=VF0/VFLS0
PIN 7=DSDI
PIN 10=GND


Those Tricores it can read is only some VW ecu’s because VVDI Prog don’t have security
bypass for other…Auid 3 ecu with tricore TC-1762 it cannot read.
Mercedes W203 mask 4J74Y pinout to Xprog and UPA
This is pinout of EZS 203 545 01 08, using ECU programmers Xprog or UPA USB programmer.
Mercedes W203 mask 4j74y
I usually use rosfar pinouts transfer pindata to Xprog. UPA read only first mcu..for second need security bites
4J74Y W203

W203 1J35D R270 BDM programmer

W203 1J35D (xJ74Y)

EIS W203 1J35D pinout Xprog-M


Yes, you can have luck to read w204 eis with Xprog and erase the flash. But many talk about their failure with W203 mask 4j74y and Xprog, coz there are many versions of Xprog box programmer clone – quality differs and depends. Have a HQ clone then go for 4j74y. therwise, you would have reading error and hear beep beep.
Site of HQ Xprog
So, Xprog is not so good with HC908. Some never got Xprog to work with HC908 in circuit. They tried and had no success to read this mask at with XPROG, usually they went with R270 programmer to read it finally – R270 without a problem (I think the new R290 or R280 should have no issues also. And R290 is better for future use.)
In sum, for 4J74Y W203, the best is ETL/R270 progrmmer, then Xprog m.
http://blog.obdii365.com/2018/01/02/xprog-upa-mercedes-w203-mask-4j74y-pinout/
How to flash Diatronik Diatronik Airbag Tool security key
Diatronik engineers will update/improve their devices recently. And here’s the detail instruction on updating Diatronik SRS+DASH+CALC+EPS OBD Tool security key.

1.After the first run utility screen will appear where you select to Start new dongle remote update session:

2.On the next page displayed is the generated update request (number-question) is a sequence of hexadecimal characters containing information about your key:

The update query can be stored in a file (button [To file]), copied with the button [To clipboard] or sent as email to developer ([mail]).
Archive the text file with results using your GCT serial # as file name and email it to developer. The update program can be closed at this stage. Wait for response email from the developer.
- Data updates are transmitted in encrypted form and can only be used once
- When generating the update data and during firmware update the key performs a series of checks on key options (ID, Shared code, and some others). This excludes the possibility of substitution of the key.
You must then run the client update utility again and select “Resume previously started remote update session”, then click [Next] button.

The screen will display the wizard page that contains the input field and display dump updates. Enter the dump received via email using one of the buttons: [Paste] or [Browse…]:
After inserting the dump and pressing [Next] button the operation for updating the key memory with new data. Then last screen will display the outcome of the operation:
Important!
Next steps are only needed when the update key is in fact the firmware or image template. If the update was performed based on data of the image file, then step 3 is the final stage of the upgrade.
In the process of updating the key memory client utility will generate the final code-confirmation containing information about the updates (successful/unsuccessful). Code-confirmation is to be saved (button [To file]) or copied [To clipboard], renamed using your serial # as file name and sent to developer of the application by any convenient way (email, PM, Skype:moe03071etc).
Here is a video operation in Russian
If you cannot understand Russian, please contact engineer via Skype above.
Instructions for configuring and remotely flashing the Diatronik Guardant security key.
http://blog.obdii365.com/2017/12/27/update-diatronik-srs-dash-tool-software/
6WA retrofit KOMBI BMW F10 535i 2011 with E-sys
How to retrofit KOMBI BMW F10 with 6WA "Black Panel" meter (go from the basic Instrument Cluster to 6WA)?
Model example: BMW F10 USA 535i 2011
(Credit to GermancaraTVO. You are at your risk)
Tools used:
Xprog m box ecu programmer
BMW ENET cable and E-sys coding software
From beginning to end - reset (mileage, VIN) => coding. Quickly and specifically according to the case. Finally - a happy owner! 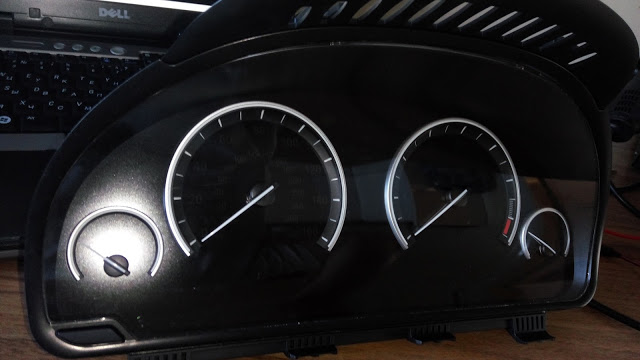
The real mileage before zeroing - 75103 km (according to VIN the meter lived earlier)
Next, disassemble the meter to get the proper access to the elements with which I will work


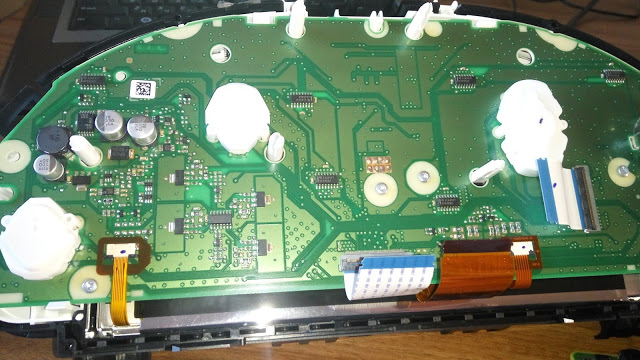
Next comes the Xprog-m programmer, by means of which I gain access to the meter's memory and do zeroing. 
Now with us on the table a ready to program / coding counter in the car with E-sys
Actually, the issue of coding for a specific car


And the end result without any kind of errors 
